PayRight User Guide
User Help
- Logging into PayRight
- Create a New User
- Reset Password
Logging into PayRight
Visit the https://merchant.payrighthealth.com/ site and choose Sign In.
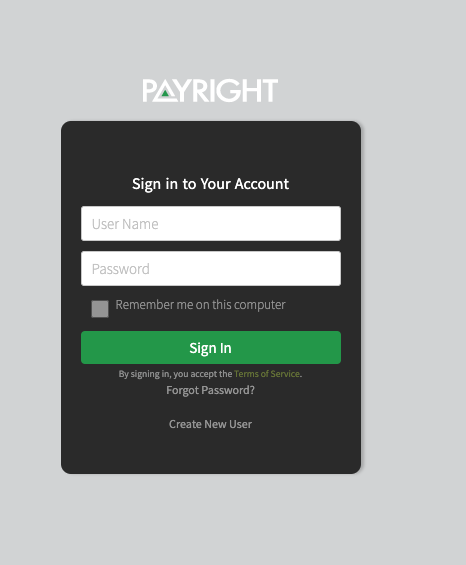
Sign In using existing credentials
If you do not have an account, choose Create New User and follow the instructions provided. New users may also be created when logged in and by visiting Settings, Team.
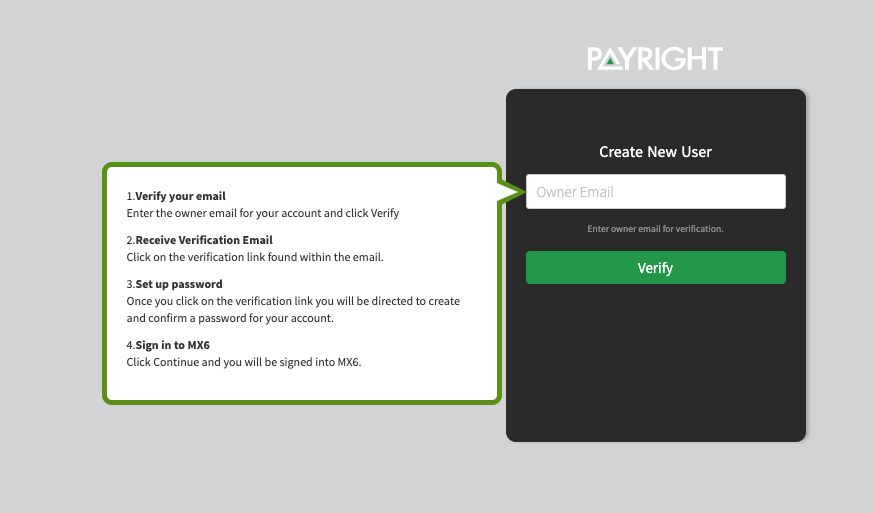
Create a new user
Password reset/requirements
If you forget your password, click on the Forgot Password link and an email will be sent to you to reset.
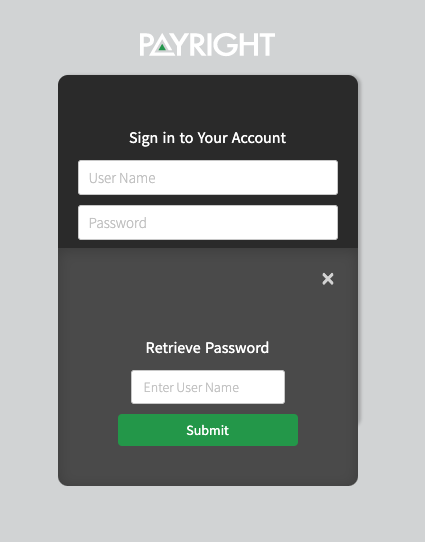
Forgot Password
You may choose to change your password when logged into PayRight by clicking on the profile icon in the top right corner. Next, select Edit. Choose Change Pasword.
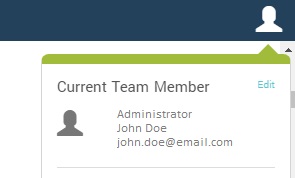
To change password after signed in, click on the Profile icon and select "Edit"
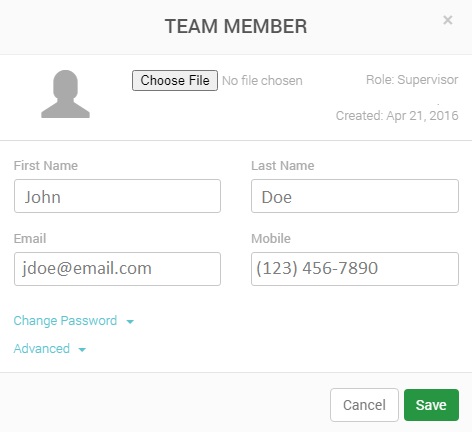
Change password after signed in
Create New User
To create a new team member, Choose Settings and Team. Simply click the +Add Team Member button in the upper right hand corner of the page.
Now you will see the pop up with the following fields:
- Username - The username this individual will have to enter each time they log into PayRight
- First and Last Name - This is the first and last name of the user that will be accessing PayRight through this username. Please note this is important as this name is reflected within PayRight any time the team member makes a change or takes a payment so you can quickly see the team member in charge of the action.
- Role - Supervisor, Clerk, or Read Only. This choice will determine what features the user can and can not see. Refer to the section below "Visibility by Role" for more information
- Active - Yes or No. If you have seasonal employees you can set them as not active which means their information is still saved however they are unable to sign in to PayRight until their account is marked as active.
- Email - Users email address
- Mobile - Cell number, used for 2 Step authentication when a code is sent to their cell as additional security upon sign in.
- Password and Confirm Password - Enter the temporary password for this user (they can change it upon login)
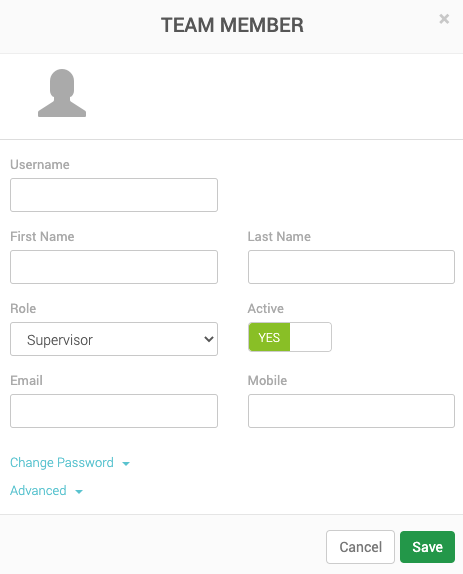
Clicking Advanced in blue text at the bottom of the pop up will allow you to set additional access restrictions for this user.
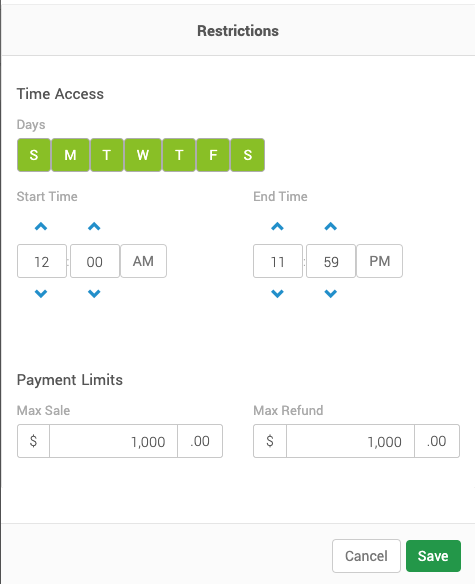
Now you will see the pop up has expanded with the following fields:
- Time Access - Days and time periods this user is allowed to sign in. In the example to the right this user is only allowed to sign in Monday - Friday between the hours of 8:00 AM and 5:00 PM.
- Days - To update the days simply select (green) or deselect (white) the days you would like this user to be able to sign in to PayRight. The default is 7 days a week (all green).
- Start Time and End Time - Now on the days that you have selected above you can now determine what time on those days they can log in. So if you don't want a clerk to go home and have the ability to still run payments or view reports you can limit their access to times they are in the office. The default is 24 hours a day.
- Payment Limits - The max sale amount and max refund amount that this user is allowed to process
- Max Sale - This is the dollar amount for a single transaction that you would like to limit this user to. For example if you limit them to $1,000 and they try to run a $1,500 transaction it will decline the transaction. If you don't want a limit simply clear out all of the numbers in the field. The default is $1,000.
- Max Refund - This is the dollar amount for a single refund transaction that you would like to limit this user to. For example if you limit them to $100 and they try to run a $500 refund it will decline the transaction. If you don't want a limit simply clear out all of the numbers in the field. The default is $1,000.
- 2-Step Authentication - For additional security you can enable 2-step authentication which requires the user to enter a code that is sent via text message each time they log into PayRight. If you have this enabled you must enter a mobile number for this user (found at the top of the pop up).
VISIBILITY BY USER ROLE AND APP
Depending on the apps that you have installed on PayRight will determine how much information is available to you and your team. Below are three matrixes that show the role and functionality each user has access to in each app.
PayRight comes standard with the functionality shown in the image to the right, however, roles determine what a user can and can not see.
Please note if you have a user that needs to be changed to a new role simply click on their name in green text on the Team settings, select the desired role and click save at the bottom of the pop up.
VIEW AND EDIT A TEAM MEMBER
To see more information on a team member click on the team member username within the list of users. Doing so will open a pop up with all of their information. If you make any changes make sure to click the save button at the bottom of the pop up in order for them to take effect.
Processing Payments
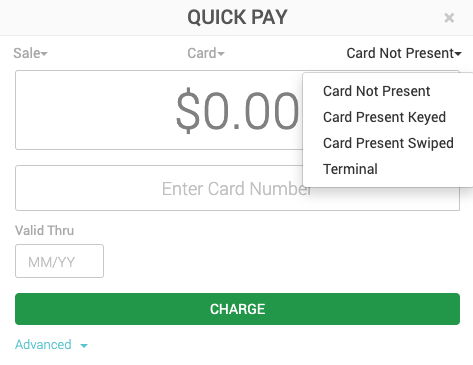
Card Sale
- To process a card sale use the following steps:
- Select payment type: Sale (Top)
- Select method: Card (Top)
- Select the appropriate card present setting: card not present, card present keyed, card present swiped (Top)
- Enter the total dollar amount to charge the patient
- Swipe or key in card number
- If Card last four is selected in Loss Prevention settings for swiped transactions, there will be a prompt to enter the last four digits of the card
- Select Advance if you wish to enter additional information
- Select Charge
Cash Sale
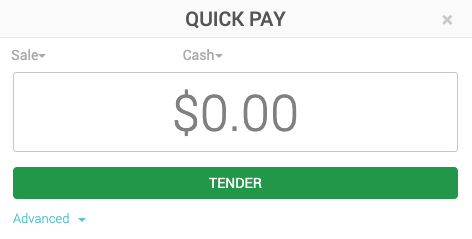
To process a cash sale use the following steps:
- Select payment type: Sale (Top)
- Select payment method: Cash (Top)
- Enter the total dollar amount to charge the patient
- Select Tender
Check Sale
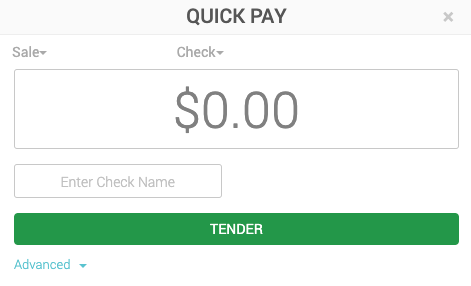
To process a check sale use the following steps:
- Select payment type: Sale (Top)
- Select payment method: Check (Top)
- Enter the total dollar amount to charge the patient
- Enter the name on the check
- Enter the phone number and Check number if prompted due to Loss Prevention settings
- Select Tender
ACH Sale
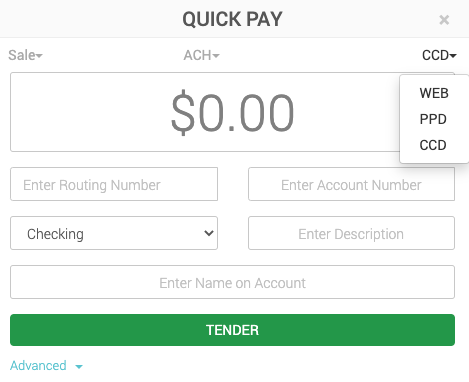
To process an ACH sale use the following steps:
- Select payment type: Sale (Top)
- Select method: ACH (Top)
- Select the appropriate security code: Web, PPD, CCD, Tel (Top)
- Enter the total dollar amount to charge the patient
- Enter routing number
- Enter account number
- Select if it is a checking or savings account
- Enter a description
- Enter the name on the bank account
- Select Advance if you wish to enter additional information
- Select Tender
Refunds
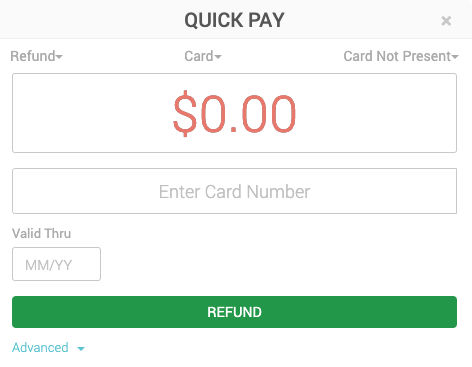
To process a new refund use the following steps:
- Click the green Quick Pay button on the left menu
- Select payment type: Refund (Top)
- Select payment method: Card, Cash, or ACH (Top)
- Select presentment type or indicator if card or ACH (Top)
- Enter an Amount
- Select Refund or Swipe Card
To process a refund on an existing payment use the following steps:
- Select Payments from the left hand menu
- Locate the original sale on the payment list
- Select the reference number in green for the sale that you want to refund
- At the bottom right of the pop up select the void or refund button
- Enter in the refund amount in the pop up (must be equal to or less than the sale)
- Select the refund button in the bottom right of the pop up
APPROVED OR DECLINED
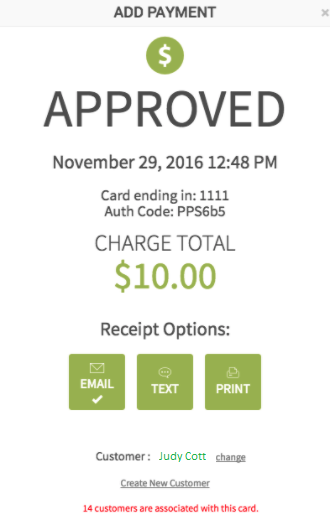
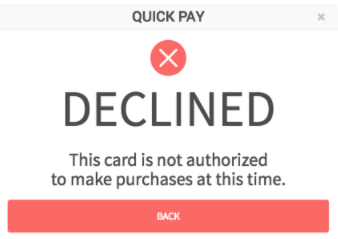
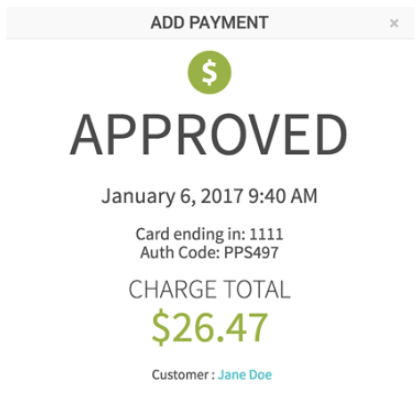
Once the Charge button is selected a pop up will be displayed showing the status of the transaction: Approved or Declined. An Approved transaction allows for a receipt to be sent via email and text or printed. A declined transaction gives the option to try running the payment again.
Approved
Congratulations! After you click the charge or tender button and see the image to the left this tells you that the payment was processed successfully and now you can choose how you would like to provide a receipt to the patient.
Receipt options can be found in the green boxes toward the bottom of the pop up. Depending on what the patient prefers select the corresponding box:
- Email - will require you to enter or select an email address
- Text - will require you to enter or select a phone number
- Print - will open up in a new tab for you to select which printer you would like to print to
* No receipt - click the x in the upper right corner of the pop up
A check on the tile means that there is either an email or phone number on file for this patient.
This next section could get a little complicated so buckle up:
At the bottom of the pop up you will notice this is where you can confirm the patient in blue or add a patient to associate to this payment if you didn't already do so in the advanced section of Quick Pay before charging the card.
If it was a card transaction, PayRight will look at the card and compare it to the card account vaults for your current patients. If it finds a match the payment will automatically be associated with that patient.
In some instances (maybe a parent and child) the card holder is the parent but the patient or patient is the child. Here you can create a new patient or select from others associated with this card by clicking change to the right of the patient name in blue.
Uh oh! If you click the charge or tender button and see the pop up to the right it means that there was something wrong with the payment. This could be any number of things:
- Something was typed incorrectly on the payment screen
- Insufficient funds on the card to cover the charge
- A hold on the card (you may have seen this happen to your own card on vacation if the credit card company finds them suspicious)
These are just a few but there could be many reasons. If this happens click on the red back button at the bottom of the pop up and try a different payment method or try to run the card again.
Declined
Receipts
Receipts are the last impression your patients have of your business after their purchase. So make it a good one and customize them to best represent your hard work.
Please note only the admin and supervisor can see these settings.
Within PayRight there are 2 types of receipts depending on how you send a payment.
Quick Pay payments receive the Classic receipt
Invoices, Recurring Plans, and Orders send Modern Receipts
Receipt Image
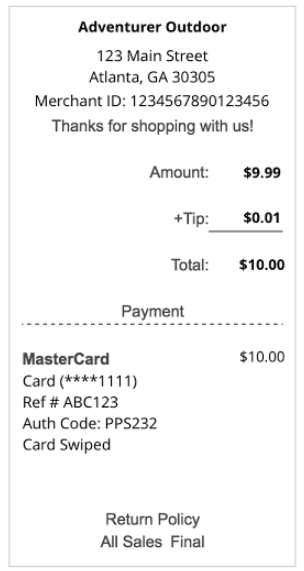
This is an example of the classic receipt and is sent to patients when a Quick Pay payment is made. On this receipt you will see the following:
- Merchant Name - What was added to your account upon completing your paperwork. (Example: Adventure Outdoor)
- Merchant Address - Listed as the business address on your account. (Example: 123 Main Street, Atlanta, GA 30305)
- Merchant ID - Your unique Id provided to you (Example: 1234567890123456)
- Header Message - Custom you can choose to use this field or leave it blank (Example: Thanks for shopping with us!)
- Amount - The amount of the transaction (Example: $9.99)
- Tips - If there was any tips added on the Express App (Example: $0.01)
- Total - The Amount + Tips if tips were added (Example: $10.00)
- Payment information
- Card Type/Cash/Check - Tender type of the payment (Example: MasterCard)
- Amount Charged to Card - How much was charged to the card, this is important for split tenders (Example: $10.00)
- Card Last 4 - We hide all but the last 4 of the card number (Example: ****1111)
- Reference # - System generated reference number (Example: ABC123)
- Auth Code - System generated code (Example: PPS232)
- Presentment Type - Card swiped, Card present keyed, card not present (Example: Card Swiped)
- Return Policy - Custom you can choose to use this field or leave it blank (Example: All Sales Final)
Receipt Image
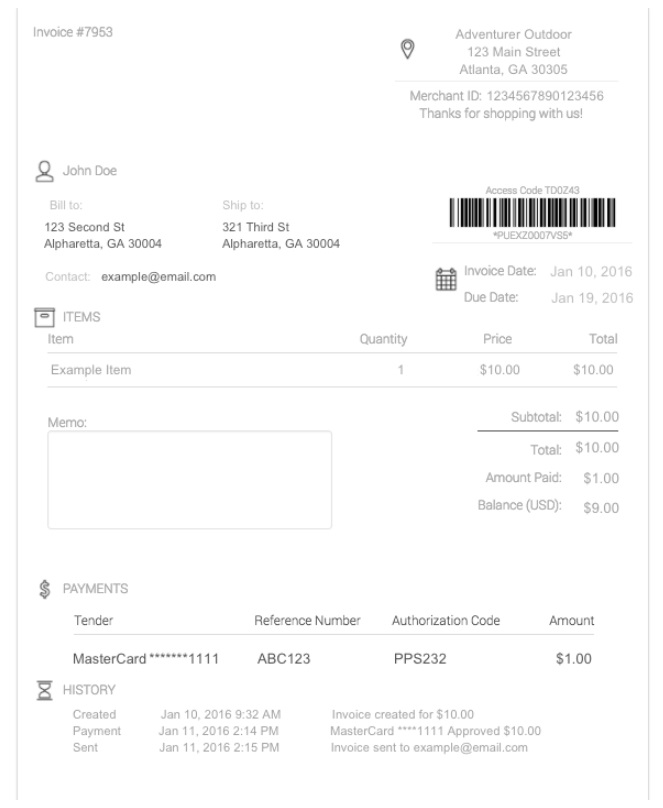
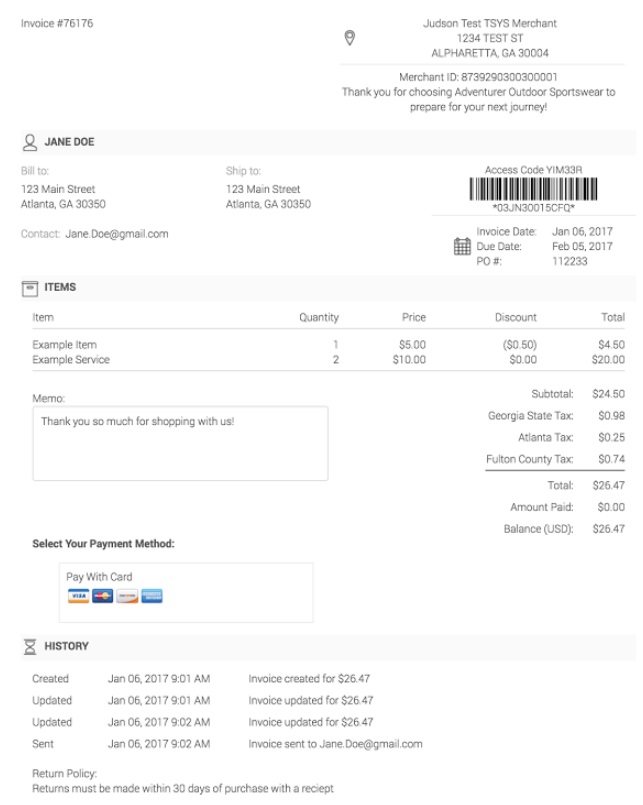
This is an example of the Modern receipt and is sent to patients when an invoice, recurring plan, or order is created.
On this receipt you will see the following:
- Logo - Upload your own in receipt settings
- Merchant Name - Merchant name on account (Example: Adventure Outdoor)
- Merchant Address - Listed as the business address on your account. (Example: 123 Main Street, Atlanta, GA 30305)
- Merchant ID - Your unique Id provided to you (Example: 1234567890123456)
- Header Message - Custom you can choose to use this field or leave it blank (Example: Thanks for shopping with us!)
- patient - patient name, billing, shipping, and contact information (this will only show if provided during creation)
- Invoice Date - Date the invoice was sent
- Due Date - Date payment from patient is required by
- Items - The item name, quantity, price, and total for each
- Memo - Will only show if added prior to sending.
- Calculations - Subtotal, total, amount paid, balance due
- Payments
- Tender - Card/Cash/Check (Example: MasterCard)
- Reference # - System generated reference number (Example: ABC123)
- Auth Code - System generated code (Example: PPS232)
- Amount Charged to Card - How much was charged to the card, this is important for split tenders (Example: $1.00)
- Presentment Type - Card swiped, Card present keyed, card not present (Example: Card Swiped)
- History - If you choose to show the history and payment these two sections will show.
- Return Policy - Custom you can choose to use this field or leave it blank (Example: All Sales Final)
WHAT YOU'LL SEE
Okay now that you know what the receipts look like, let's jump back to the settings and customization.
This page is broken up by the following sections:
- Header Message
- Receipt Image
- Available Receipt Information
- BCC Receipt To
- Return Policy
- Display Tip
- Display History
- Preview
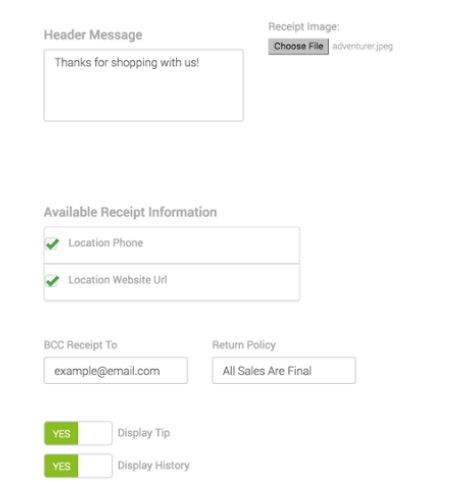
Receipt settings with image for merchant
HEADER MESSAGE
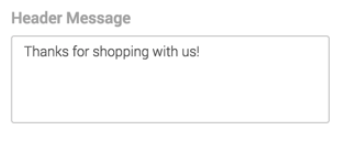
Image for Header Message
The header message is a great place to add a friendly message to the patient or any additional information you feel all patients should see. This is a free form text box, enter as much as you would like in this field.
Please remember that if you add a lot of information in this field it will shift the look of your receipt.
Receipt Image
Customize your receipt and add a picture of your logo to the top of the modern receipts that you send.
To add a new receipt image:
- Click on the gray Choose File button.
- Your computer files pop up should appear where you can select the file from your computer
- Choose and click open on the pop up
- The file will be loaded and you will see the preview just below the Choose File button.
To change the photo just click the Choose File button and select a new image
Available Receipt Information
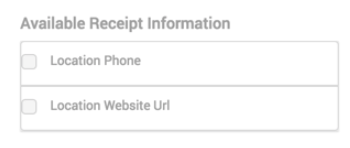
Image for Available Receipt Information
Use the checkboxes to select if you would like to show your business phone number and location website URL on the top of your receipts. Leaving the boxes unchecked will keep this information from being displayed.
BCC Receipt Information
The BCC receipt information field will send a copy of every transaction receipt that is made through PayRight on this account to the email address specified.
Don't worry the patient never sees your email address but it is a way for you to receive full payment details on each payment.
To add more than one email address to receive a copy of the receipts simply click the space, comma, or enter button on your keyboard then start typing in the next email address.
Please note only one email address can be entered in this field.
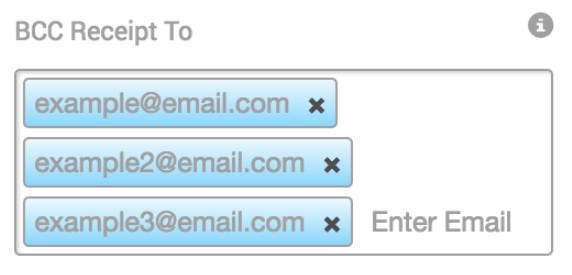
Image for BCC Information
Return Policy

Image for Return Policy
Return policy is located at the bottom of the receipt, use this field to inform your patients of your return requirements so be as descriptive or brief as you want. (Example: Returns must be made within 30 days of receipt date, with tags and receipt)
If you don't want the return policy to appear just leave it blank
Display Tip
MX™ Express (iPhone/iPad) and MX™ Retail (iPad) allow patients to add tip during checkout. Turning to Yes will show tips on the Classic receipts that are printed from those apps. Choosing No will not display tips even if tips are provided.

Image for displaying Tip
Display History

Image for displaying history
Displaying history is for the Modern receipts that come from invoices, recurring plans, and orders. History contains when it was created, sent, updated, and payments were made. If you want your patients to see this information turn the toggle to Yes, if not switch it over to No.
Preview
Now that you have made all the necessary changes, click the blue preview button in the bottom right of the screen. Here it will show you both the classic and modern receipt based on the changes you made. If you like it close out of the pop up and click the green save button at the bottom of the screen.
INVOICES
If you are in need of invoicing your patients with line item detail and possibly the use of payment terms, then the Invoice App is for you! By selecting the invoice page from the left hand menu, you will find a list of all invoices created through PayRight.
WHAT YOU'LL SEE
Invoices show all invoices regardless of their status. To view a list of all invoices click on Invoices in the left hand menu.
Each invoice line displays with:
- Invoice # - System generated invoice number each time an invoice is created
- patient - The name of the patient the invoice was sent to
- Total - Total amount that was billed to the patient through the invoice (this total includes tax and discounts)
- Status - Automatically set based on the remaining balance on the invoice. (Statuses: Draft, unpaid, partially paid, paid, past due, cancelled)
- Invoice Date - Date invoice was sent to the patient
- Due Date - The date in which payment from patient is due by
- Terms - If there were any terms allowed on the invoice (Term options: custom date, upon receipt, net 15, 30, 60, 90)
INVOICE STATUS
A draft invoice. This invoice has not been sent to the patient and can still be edited.

An unpaid invoice. This invoice has been sent to the patient and has an outstanding balance.

A partially paid invoice. A payment is associated with the invoice but there is still an outstanding balance.

A paid invoice. The invoice has been fully paid.

A past due invoice. This invoice has a remaining balance and a due date that has passed.
SEARCH, FILTER, AND EXPORT
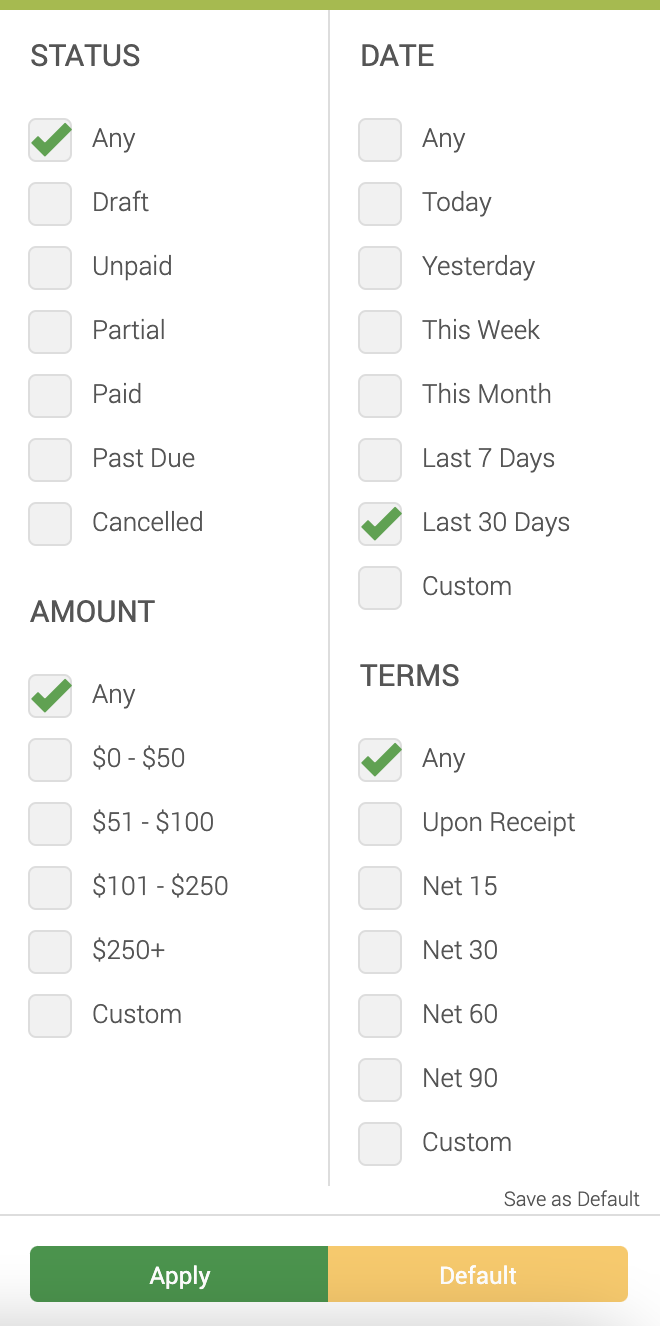
To locate a specific invoice use the search box in the upper right. To search, simply type the invoice # or the patient name you are looking for and hit enter.
To access the filter, select the down arrow to the right of the search box. Select the criteria you want to filter on and click Apply. Please note, these filters will only be applied if you click the green Apply button at the bottom of the display, clicking outside the box will cancel your changes.
To reset your search criteria click default and the Apply button. If you want to set your own defaults check the boxes you would like to filter on, then click Save as Default in the lower right. Now whenever you come to the Invoice page, your filter options will be automatically applied (this can be used for any of the filters).
To the right of the filter you will notice that there is also an export button that will export the current search and filter you have set and convert it into an excel spreadsheet.
CREATE A NEW INVOICE

To create a new invoice simply click the +Add Invoice button in the upper right hand corner of the Invoice page.
Now you will be taken to a new screen to fill out your invoice information found in the image to the right.
There are a lot of fields to discuss on this page so let's break it up by top and bottom.
Top section: patient name, patient email, patient phone number, invoice date, due date, billing and shipping address, PO number, and Payment link
Bottom section: items, quantity, price, discounts, total, tax, and memo.
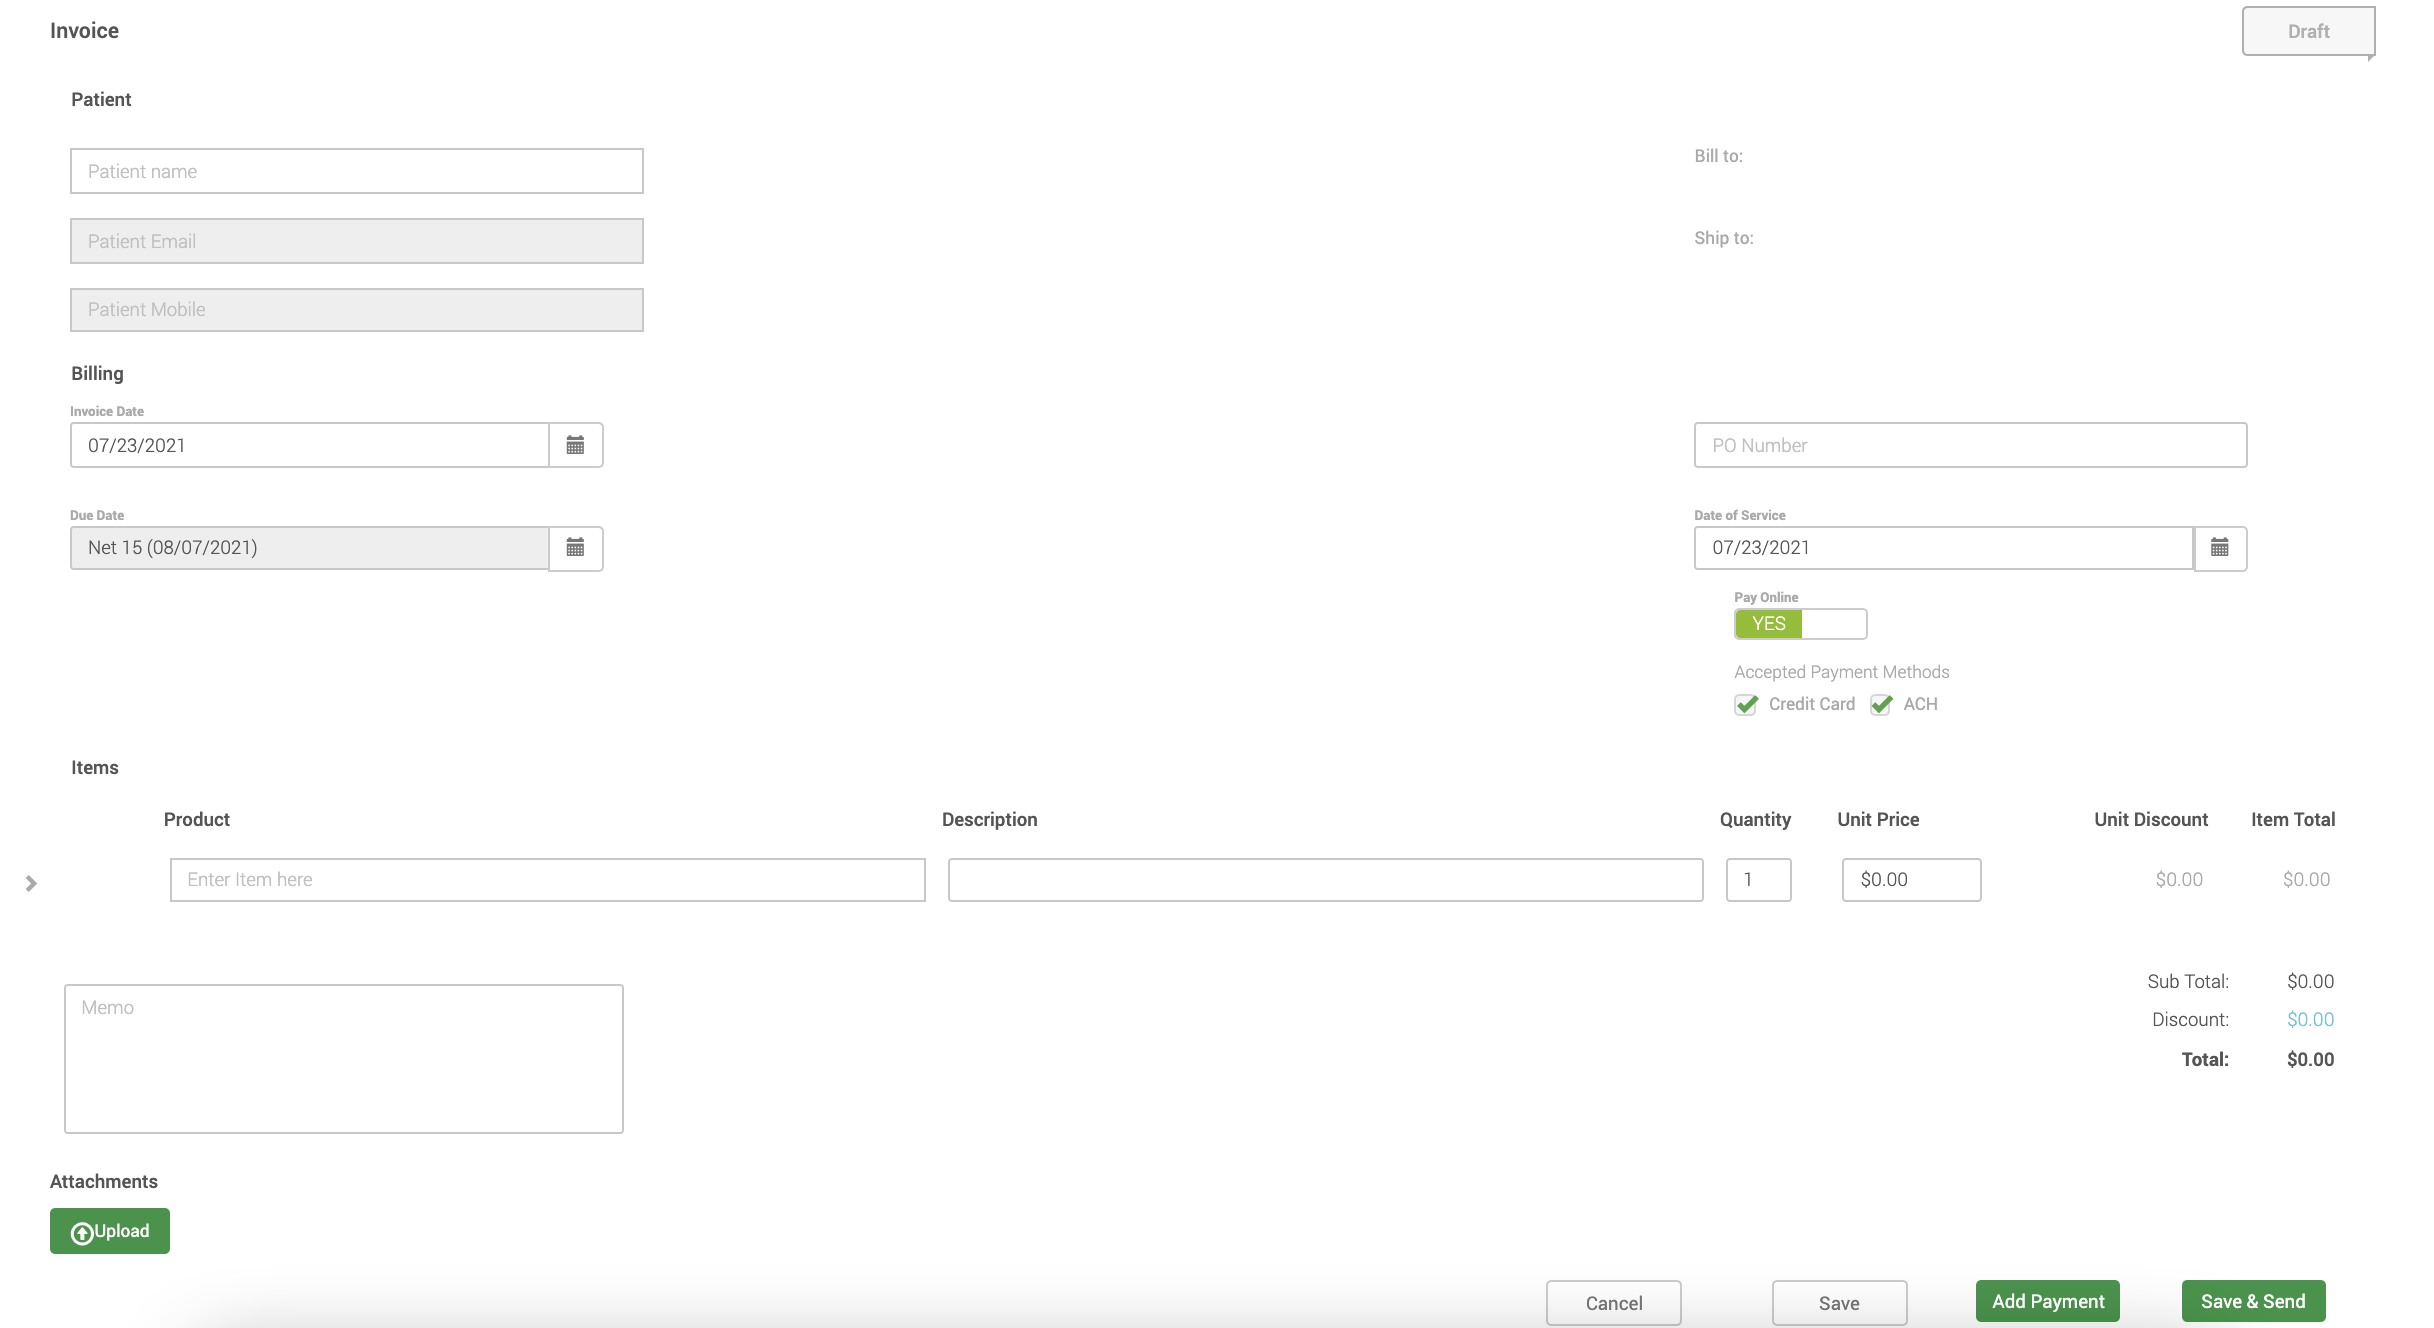

Enter patient Name - Start typing in the name of the patient, a list will appear with potential matches (this is pulling from the patients you have already created on the patient tab in the left menu).
- If you see the patient you are looking for in the drop down list provided, simply click the check box to the left of the patient name.
- If you don't see the patient name or that patient does not yet exist, simply click the blue Add New patient text at the top of the list. Clicking this will now bring up a pop up for you to create the patient record. Enter the first and last name (if it isn't there already) and any other information you wish to provide, then click save. You are now back to the invoice and should see your patient has been added in the first field.
Enter Email - This is the email address for the patient that the invoice will be sent to when clicking the Send button at the bottom of the page. If your patient already has an email address associated with their account/record it will automatically appear in the email box.
- If you would like to change the email address to another email simply click the red X to the right of the field and enter a new email address.
- If you just created this patient on the invoice they won't have an email address so you will need to manually enter the email address for this patient here. Next time you invoice the patient this email address will appear so you don't have to type it again.
Enter Phone Number - This is the mobile phone number for the patient that the invoice will be texted to when the Send button, at the bottom of the page, is clicked. If your patient already has a phone number associated with their account/record it will automatically appear in the phone number box.
- If you would like to change the phone number simply click the red X to the right of the field and enter a new phone number.
- If you just created this patient on the invoice they won't have a phone number so you will need to manually enter the phone number for this patient here. Next time you invoice the patient this phone number will appear so you don't have to type it again.
Invoice Date and Payment Terms
Invoice Date - Automatically uses the date you are creating the invoice, however, you do have the option to change it to any date in the future. To change the invoice date, simply click on the calendar icon to the right.
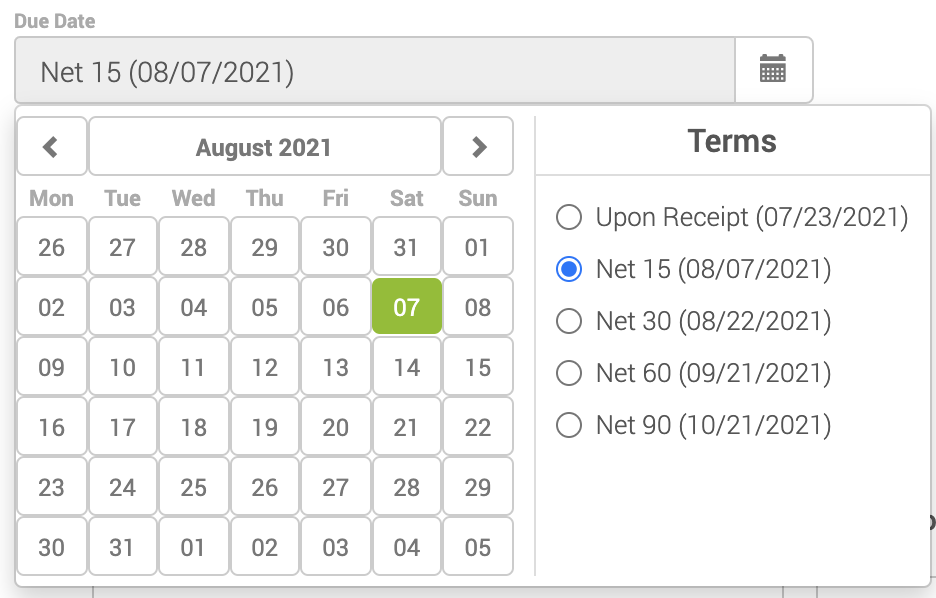
Due Date and Terms - Terms are set automatically based on the default you have selected under invoice settings, however, you can change the due date and terms on the invoice by clicking on the calendar icon to the right. You will then see two options (shown in the image below):
To select your own due date from the calendar
Select the terms you want to allow for this invoice. If you select a term PayRight shows you the calculated due date based on the term selected.
More Section
Now that the patient information has been entered you will see a blue More button appear just below the email address field. This section contains billing address, shipping address, additional contact information, PO number and payment link options. This is additional information that will usually be pre populated for you based on the patient information being filled out or default settings.
Bill To, Ship To, and Phone - The billing is where the invoice should be sent or the address for the credit card. Shipping is the address that the items should be sent to and phone number is additional contact information.
- If you would like to change the billing address, shipping address, or phone number for the patient on the invoice simply click the blue pencil icon to the right of the x. This will allow you to add a new address or select another one on file.
- If you just created this patient they won't have an address so you will need to manually enter one by clicking on the blue plus icon if you find this to be important to capture on the invoice.
PO Number - This is a free form box, if you have another system that you use in conjunction with PayRight and need to capture a reference number you can add it in this field.
Payment Link - A payment link is provided when the invoice is sent via email to the patient. On the invoice it will give the patient the option to make a payment and enter in their card/account information. Once the payment is processed it will automatically update the invoice for you.
Item Information
Items are manually entered (unless you have the MX™ Retail app installed and then you can use products on the invoices and track inventory).
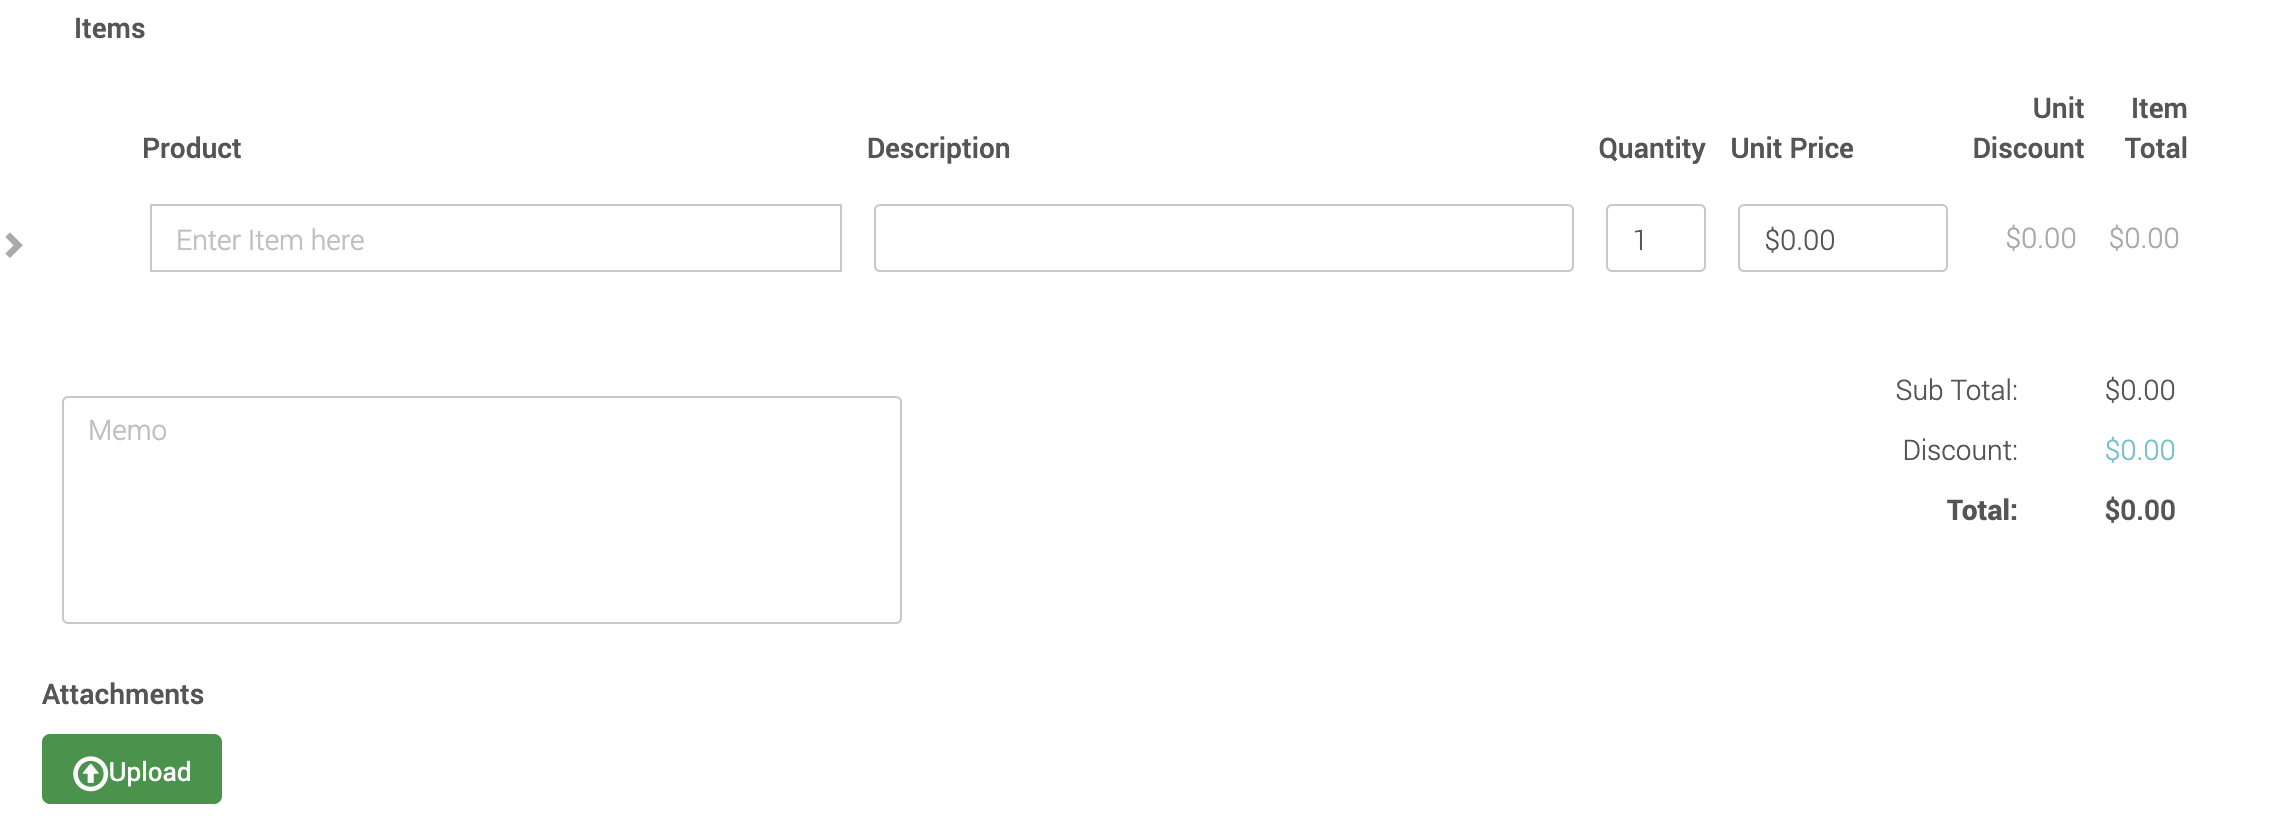
Enter Item Here - You can type the item name and/or description of the good or service the patient is being billed for. Once you are done filling out the item information you can click the tab to get to the next field or use the mouse and click into the next field. When you move onto the next field you will notice another line item appears for you to continue entering as many items as you need.
Quantity - The amount of this item you are billing this patient. The default is 1 but you can change it to any number higher than 1.
Price - The amount the patient is being charged for this item. Please note the price should be for one item, if the quantity is greater than 1, PayRight will calculate the total for you.
Item Tax
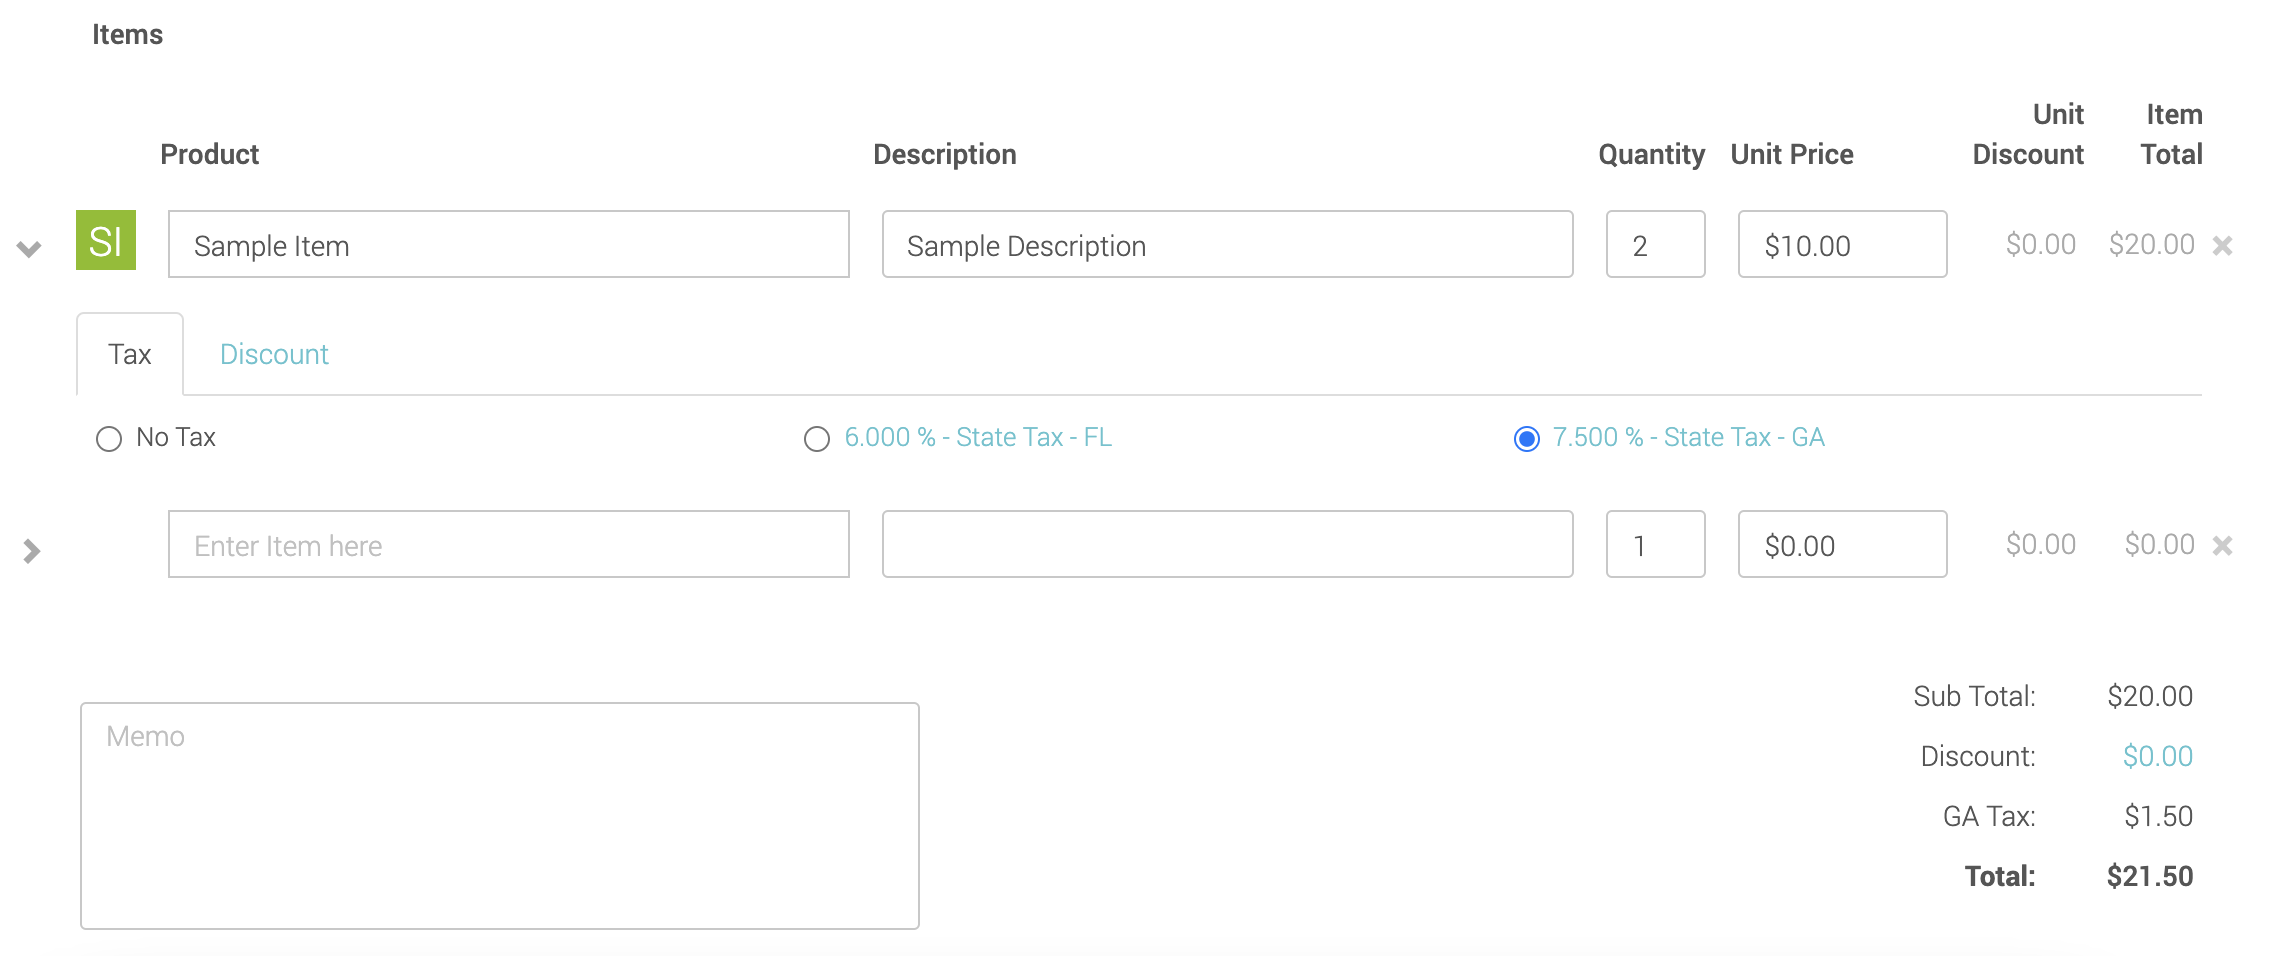
To add tax to the line item simply click the chevron or arrow found to the left of the item. A new section will expand showing you the taxes and discounts, tax being the first tab. You can only select one tax category per item. When you select a tax rate it will appear in the calculation total to the right of the memo.
Item Discounts
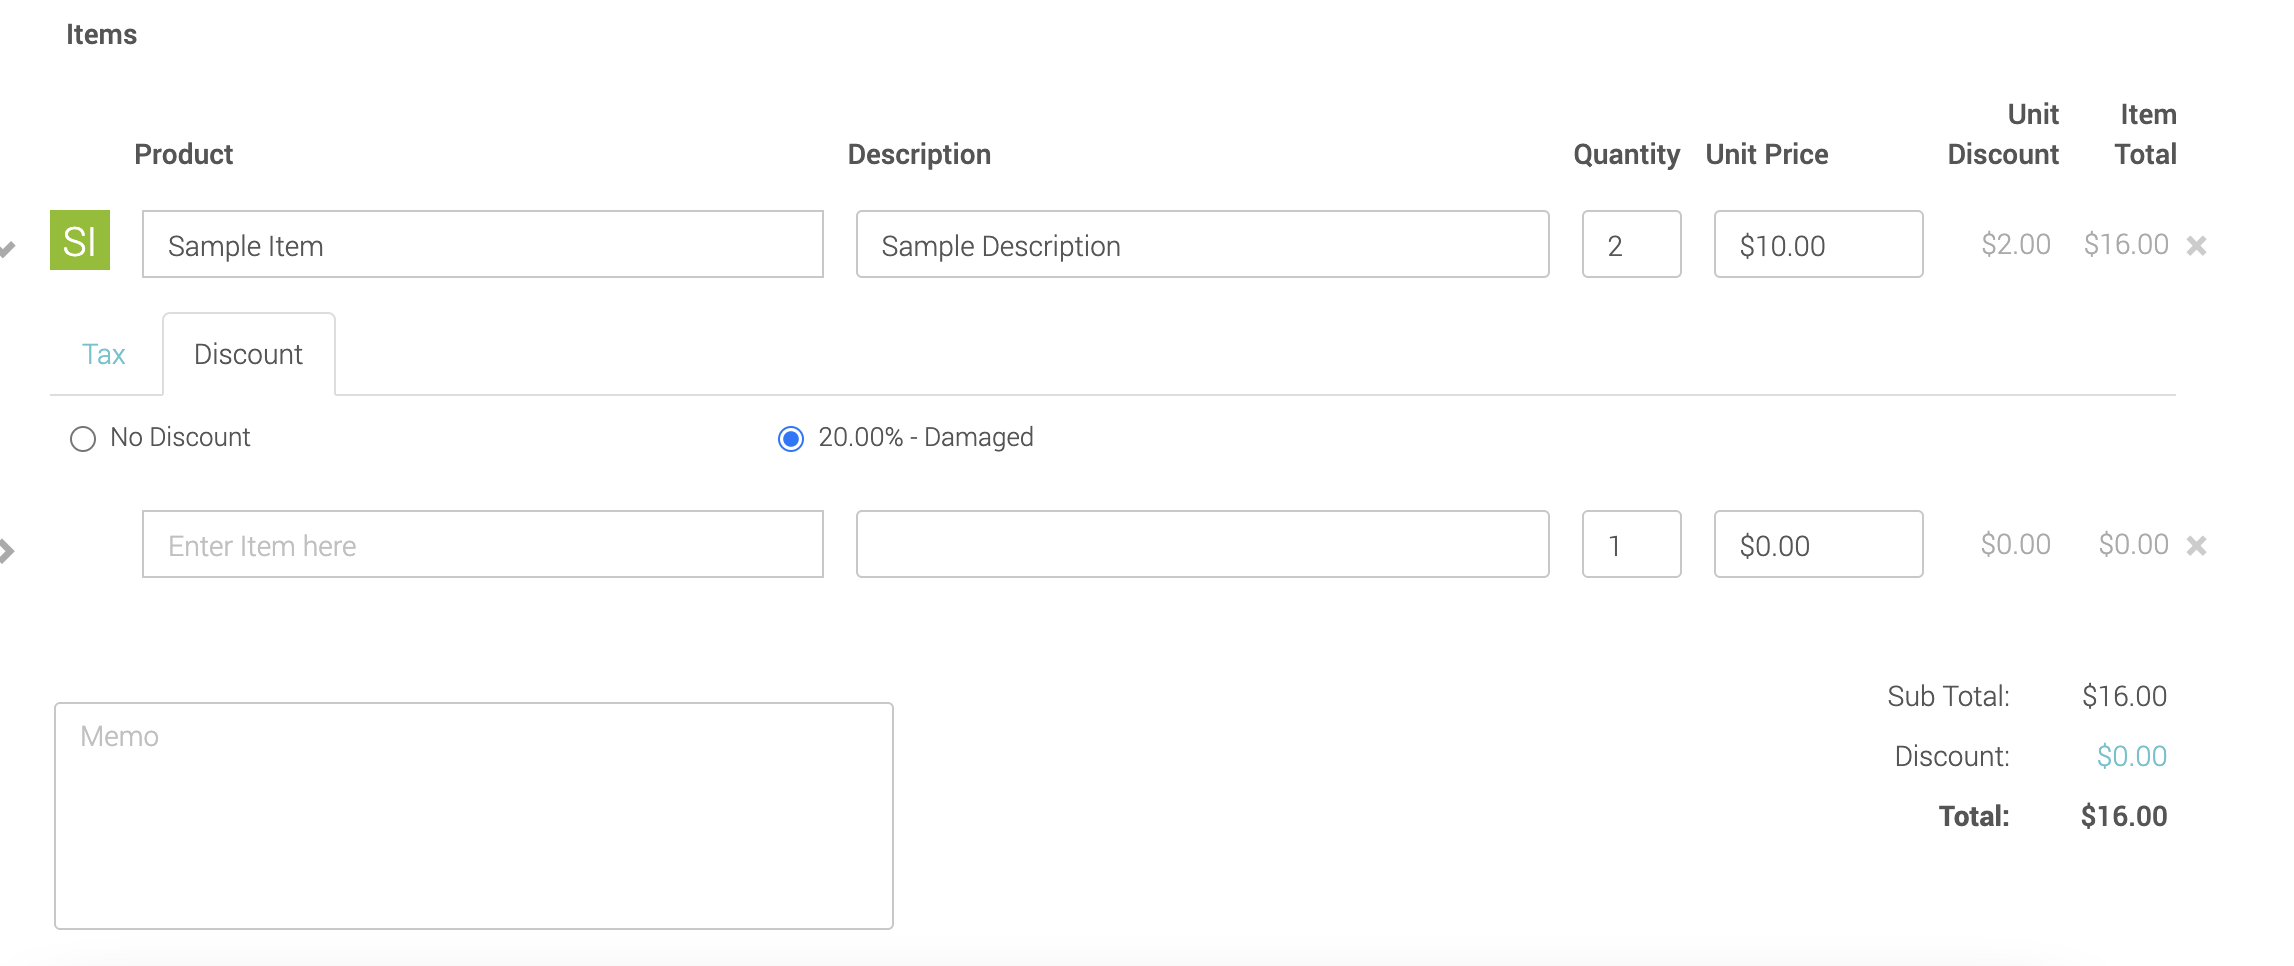
To add discounts to the line item simply click the chevron or arrow found to the left of the item. A new section will expand showing you taxes and discounts. Click on the discount tab. Now you will see the discounts you have created in the discount settings. You can only select one discount per item. When you select a discount it will automatically reflect to the right of the price and the total will also be updated.
Order Discounts
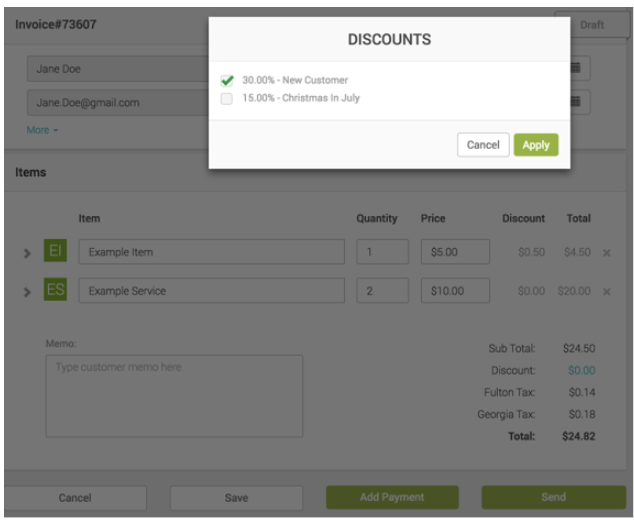
You can add as many order level discounts as you would like. To do so simply click on the $0.00 in blue under the subtotal. A pop up will appear and allow you to select using a check box all of the order level discounts you want to apply in addition to the line item discounts
Once you have made your selection don't forget to click the green Apply button to confirm.
Discounts
Buttons
The buttons at the bottom of the invoice (also pictured below) allow additional flexibility with the invoicing capability.
- Cancel - Completely delete this invoice
- Save - Save as draft and come back to it later or save and keep working without having to worry about losing all of the work you have already done.
- Add Payment - If you don't want to send the invoice to a patient and just want to add a payment just click this button, enter in the payment info and you are set!
- Send - If you would like to send a copy of the invoice to the patient or you have the payment link option turned on and would like them to pay directly to the invoice.

VIEW
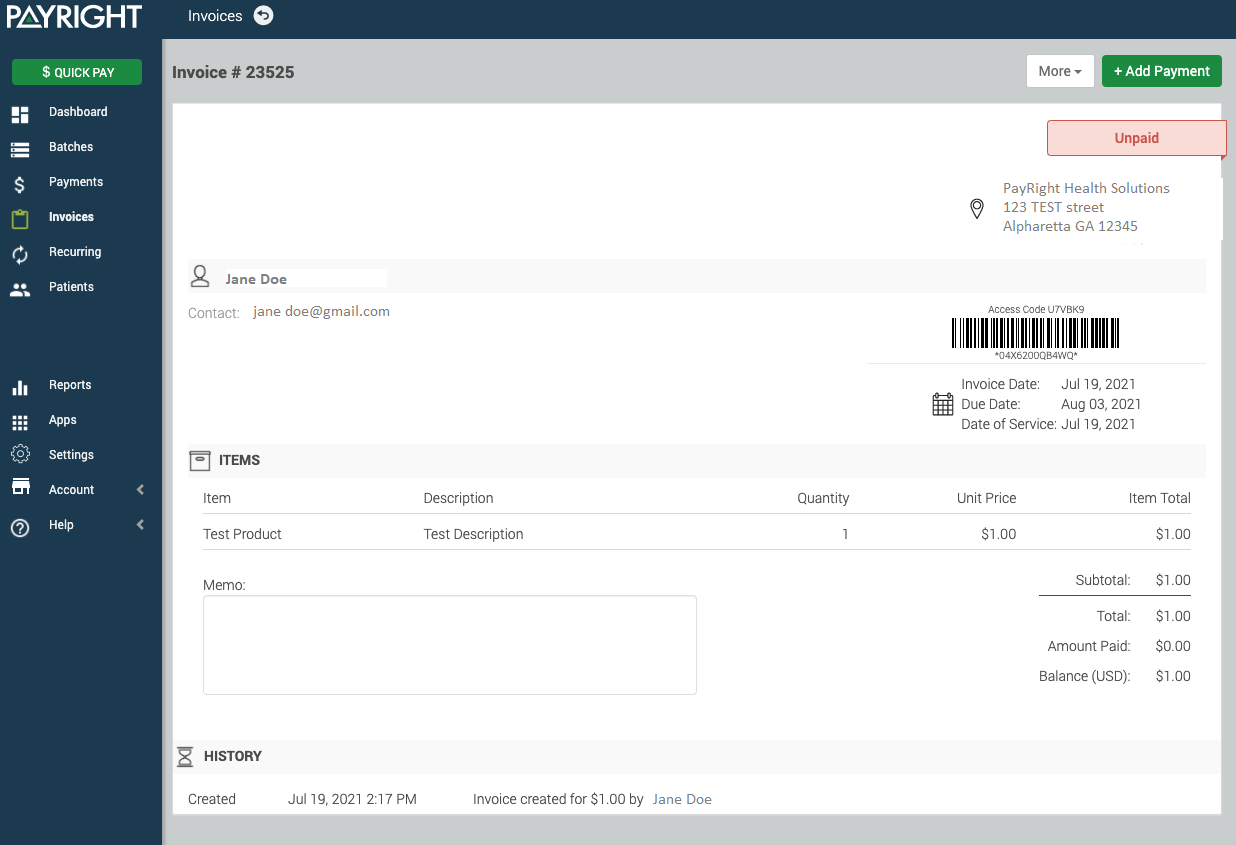
To see more information on an existing invoice click on the invoice number within the list view of the invoice page. Doing so will take you to the invoice preview shown in the image below. This preview is what the patient saw if you choose to email them a copy of the invoice.
On the left is what you will see in PayRight and on the right is what your patients will see when the invoice is sent to them via email.
Patients can also receive an invoice on their mobile device if a phone number for the patient was added when creating the invoice. patients will receive a text message with a link and a 6-digit access code. On clicking the link, patients will see the short version of the invoice with a link to make payment.
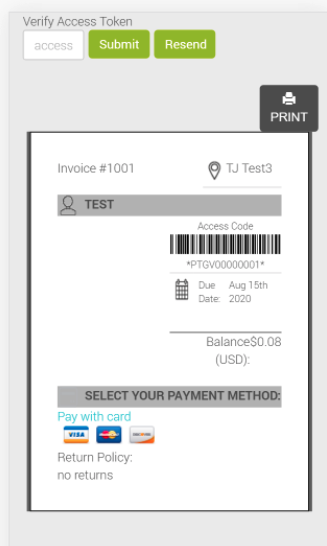
They can choose to make the payment or view the detailed invoice. To view the detailed invoice, they will need to use the 6-digit access code that was texted to them. The detailed invoice view will look like:
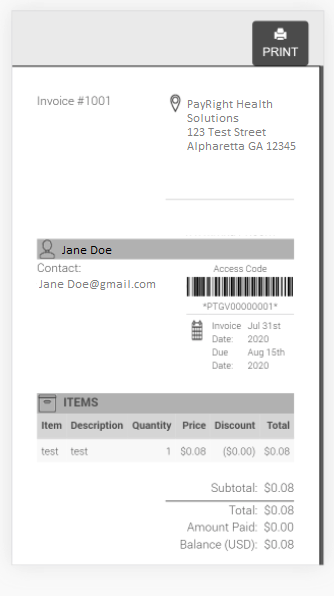
The access code will expire after it is used once or after 15 mins if it hasn't been used.
EDIT
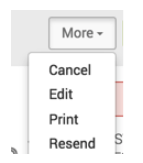
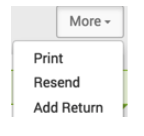
As long as there are no payments on an invoice the information and line item detail can still be changed. To change an invoice click on the more button in the upper right of the screen. Here you have the following four options:
- Cancel - This is how you would void out this invoice if you didn't want to bill the patient any
longer or needed to start over on a new invoice - Edit - This will take you back to the first screen (just like what you saw when you were creating
the invoice for the first time) to make the desired changes, save, and resend. - Print - Here you can print the invoice for your own records or if you want to hand a copy to the
patient. - Resend - You can email or text the invoice in case they failed to receive it the first time or as a
reminder to pay.
PAYMENT
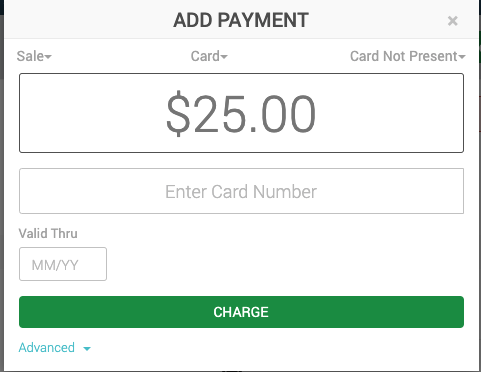
To add a payment on an invoice click on the green +Add Payment button while on the invoice preview. Once you click on the button a pop up will appear, pre-filled with the outstanding balance of the invoice. This is just like Quick Pay so across the top you can change your options to fit the payment method and presentment types for this payment. If you would like to change the amount to break up the payments simply click in the amount field, clear out the numbers and start typing the desired payment amount. Complete the payment depending on your tender type selected and click charge/tender.
Once a payment has been made on an invoice and the patient needs to return an item you can do so by clicking the More button in the upper right while on the invoice preview. Here you will see a new option which says "Add Return". Clicking on this option will bring up a pop up.
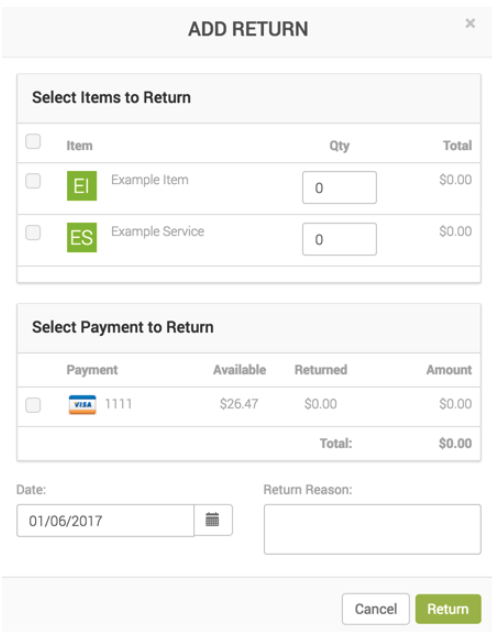
Now you will see the pop up to the left with the following fields:
Select Items to Return - The items shown here will pull from the items you have on your invoice. Use the check box to the left of the item to select which item you would like to return. Double check that the quantity is correct and the total will be calculated for you.
Select Payment to Return - The payment methods shown are those that were made to pay the invoice, select the payment method you would like to return the funds to.
Please note you can only return an amount less than or equal to the amount the patient has paid. For example, you can not return $10.00 to a patient who has only paid for $5.00.
Date - Day the return was made. This is for the history event to tell you the date that the return was made and is defaulted to the current date.
Return Reason - This is optional, if you would like to list out why the item was returned for future reference you can do so here.
When you are done, click the green Return button at the bottom of the pop up.
Recurring
Recurring billing allows you to automatically charge a cardholder for specified goods or services on a prearranged schedule. To view your recurring payments select Invoice on the left hand menu, then click on the Recurring tab at the top to see a full list of all plans created through PayRight.

WHAT YOU'LL SEE
Recurring shows all contracts regardless of their status. To view a list of all contracts click on Invoices in the left hand menu, then click on the recurring tab toward the top of the invoice page.
Each recurring line displays with:
- Contract # - System generated contract number each time a contract is created
- Patient - The name of the patient being billed for the contract
- Frequency, Every, On - How often the recurring plan is scheduled to bill the patient
- Plan - If you have recurring templates in use (refer to invoice app settings for more information)
you will see those here - Amount - Total amount billed to the patient each time the contract/recurring plan is scheduled to
run - Status - If the contract is actively running, paused, or cancelled (Statuses: active, paused,
cancelled) - Last Billed Date - The date the recurring plan was last run to bill the patient based on the
schedule for the contract/recurring plan
RECURRING STATUS
An active contract. This contract is set to run on the next scheduled due date.

A paused contract. This contract will not run until manually reactivated.

A cancelled contract. No further action is available, this contract has been voided.

SEARCH, FILTER, AND EXPORT
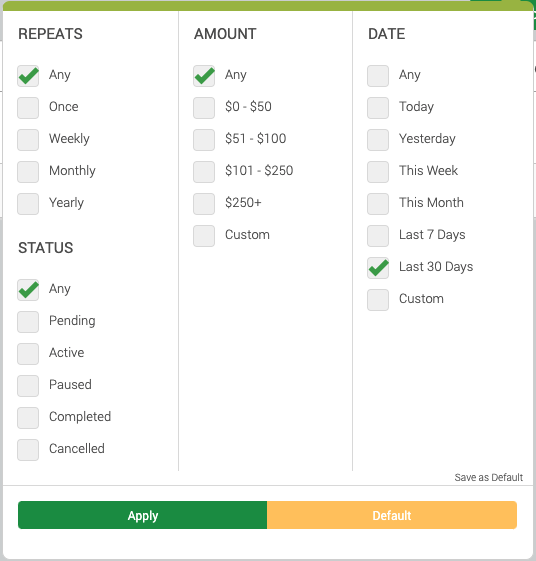
To locate a specific contract use the search box in the upper right. To search, simply type the invoice # or the patient name you are looking for and hit enter.
To access the filter, select the down arrow to the right of the search box. Select the criteria you want to filter on and click Apply. Please note, these filters will only be applied if you click the green Apply button at the bottom of the display, clicking outside the box will cancel your changes.
To reset your search criteria click default and the Apply button. If you want to set your own defaults check the boxes you would like to filter on, then click Save as Default in the lower right. Now whenever you come to the Recurring page, your filter options will be automatically applied (this can be used for any of the filters).
To the right of the filter you will notice that there is also an export button that will export the current search and filter you have set and convert it into an excel spreadsheet.
CREATE A NEW CONTRACT

To create a new contract simply click the +Add Contract button in the upper right hand corner of the Recurring page.
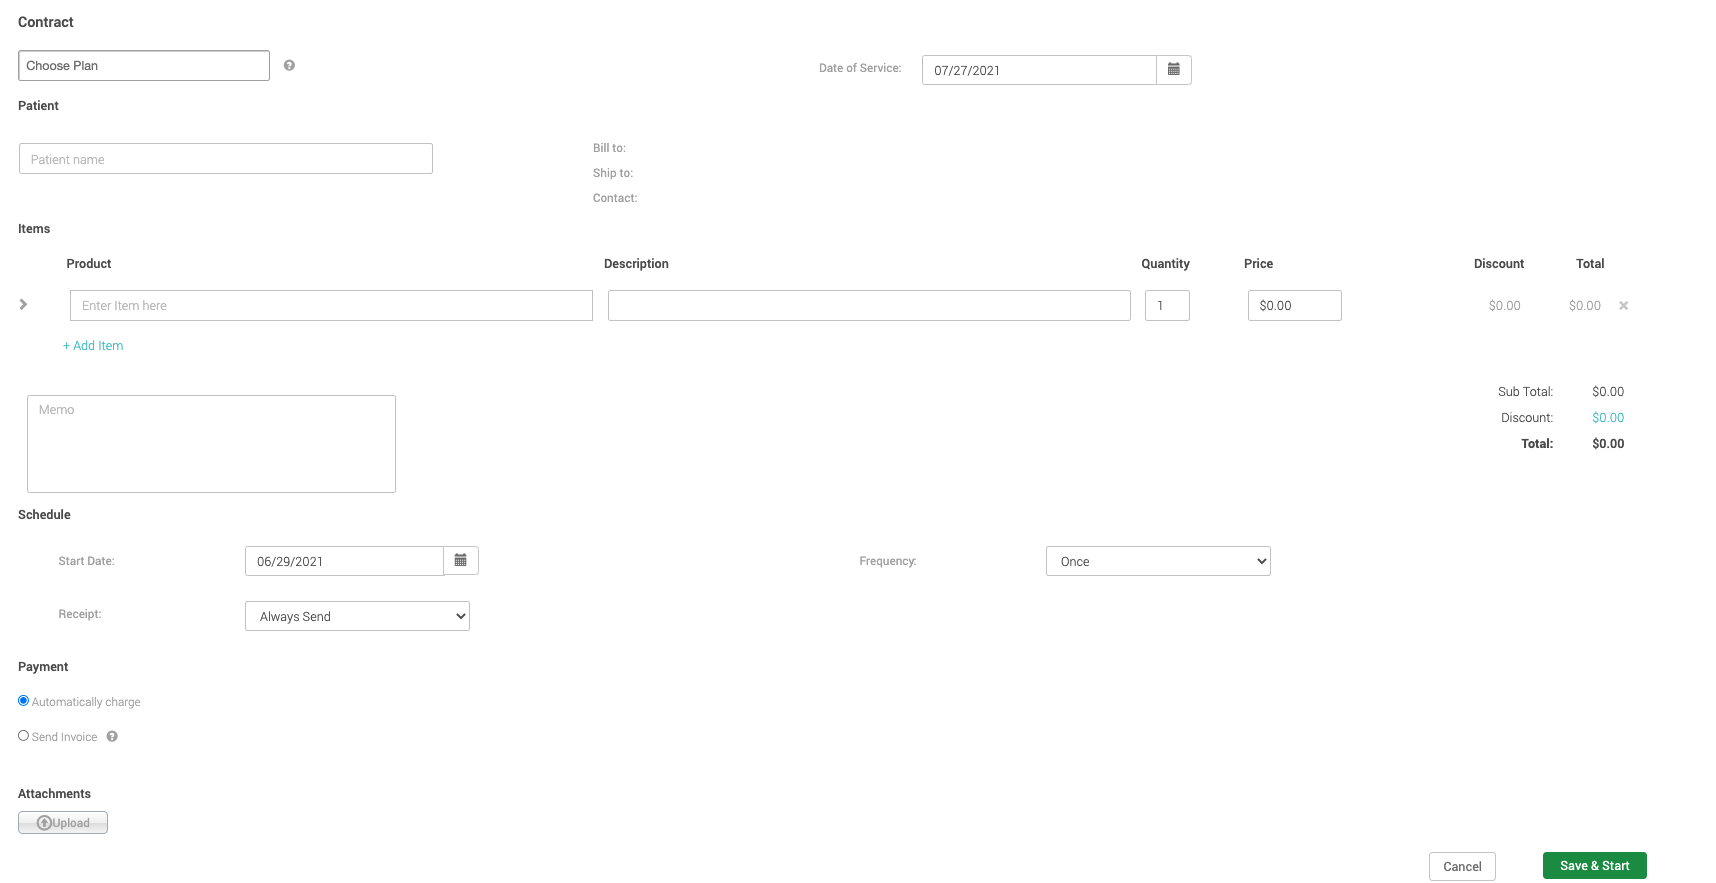
Now you will be taken to a new screen to fill out your contract/recurring plan information found in the image to the right.
You may notice that this page looks very familiar to the invoice page. That is because a recurring plan is essentially just an invoice that is being automatically billed to your patient on a predetermined schedule.
There are a lot of fields to discuss on this page so let's break it up by the following sections:
- Contract - Patient information and Plan template
- Schedule - How often the contract should run, Start date, and terms
- Items - What the patient is being billed for, tax and discounts
- Payment - How the plan is being paid, proration, and receipt options
Contract
Enter Patient Name - Start typing in the name of the patient, a list will appear with potential matches (this is pulling from the patients you have already created on the patient tab in the left menu).
- If you see the patient you are looking for in the drop down list provided, simply click the check box
to the left of the patient name. - If you don't see the patient name or that patient does not yet exist, simply click the blue Add New
Patient text at the top of the list. Clicking this will now bring up a pop up for you to create the patient
record. Enter the first and last name (if it isn't there already) and any other information you wish to
provide, then click save. You are now back to the contract and should see your patient has been
added in the first field.
Choose Plan - This is an optional field. If you have plans setup within your invoice/recurring settings and would like to pre-populate the recurring contract with information from your saved template you may do so by entering in the name of the plan you created and selecting it from the list provided. Once you select the plan name you will see the information from that template has been automatically added to the contract for you. Please note you may change this information, however, any changes will remove the plan name but will not affect your template.

More Section
Now that the patient information has been entered you will see a blue More button appear just below the patient name field. This section contains billing address, shipping address, additional contact information, and the option to add attachments.
Bill To, Ship To, and Contact - The billing is where the contract should be sent or the address for the credit card. Shipping is the address that the items should be sent to and contact is a phone number or email address as additional contact information for this patient.
- If you would like to change the billing address, shipping address, or phone number for the patient
on the invoice simply click the blue pencil icon to the right of the x. This will allow you to add a new
address or select another one on file. - If you just created this patient, they won't have an address so you will need to manually enter one
by clicking on the blue plus icon if you find this to be important to capture on the contract.
Attachments - Use the attachments to upload any PDF file you feel is necessary to keep on file for this contract. These could be agreements that you require, miscellaneous forms, and/or copies of identification. There is no limit to the amount of files that can be uploaded for each contract, so upload away!
Schedule
Determine how often the recurring plan should bill the patient.
Frequency - Choose if you would you like this recurring plan to run: weekly, monthly, or yearly
Every - Now that you have chosen the frequency, determine if it should be every week/month/year
if so enter a 1. Every other week/month/year enter a 2. And so on.
On - Now that you've chosen the frequency and every, determine when in the week/month/year
the payment should take place.
- Example: if you want to charge every month on the 1st. Frequency = Monthly, Every = 1. On = Day, 1
- Example: if you want to charge every month on the 15th. Frequency = Monthly, Every = 1. On = Day,
15 - Example: if you want to charge every month on the first weekday. Frequency = Monthly, Every = 1.
On = First, Weekday - Example: if you want to charge once a year on a specific day. Frequency = Yearly, Every = January.
On = Day 1 (select the month and day within the month you want to bill) - Example: if you want to charge bi-weekly on a specific day(s). Frequency = Weekly, Every = 2. On =
Monday
Start Date - Even though you have selected your schedule and are creating the contract you can schedule the start date of the contract
Occurrences - How many times you want this contract to run through the schedule you've selected. Leave it blank (shows Unlimited) if you want them to continue until you manually cancel the contract.
- Example: if you want your monthly contract to run for a year and then stop running payments once a
year of payments have been made, simply enter the number 12 for the number of occurrences.
Terms - If you would like to give your patients x number of days to pay the recurring plan after the scheduled date.

Item Information
Items are manually entered (unless you have the MX™ Retail app installed and then you can use products on the invoices and track inventory).
Enter Item Here - You can type the item name and/or description of the good or service the patient
is being billed for. Once you are done filling out the item information you can click ‘tab’ to get to the
next field or use the mouse and click into the next field. When you move onto the next field you will
notice another line item appears for you to continue entering as many items as you need.
Quantity - The amount of this item you are billing this patient. The default is 1 but you can change it
to any number higher than 1.
Price - The amount the patient is being charged for this item. Please note the price should be for
one item, if the quantity is greater than 1 PayRight will calculate the total for you.
Item Tax
To add tax to the line item simply click the chevron or arrow found to the left of the item. A new section will expand showing you the taxes and discounts, tax being the first tab. You can only select one tax category per item. When you select a tax rate it will appear in the calculation total to the right of the memo.

Item Discounts
To add discounts to the line item simply click the chevron or arrow found to the left of the item. A new section will expand showing you taxes and discounts. Click on the discount tab. Now you will see the discounts you have created in the discount settings. You can only select one discount per item. When you select a discount it will automatically reflect to the right of the price and the total will also be updated.
Order Discounts
You can add as many order level discounts as you would like. To do so simply click on the $0.00 in blue under the subtotal. A pop up will appear and allow you to select using a check box all of the order level discounts you want to apply in addition to the line item discounts
Once you have made your selection don't forget to click the green Apply button to confirm.
Payment
Once a patient has been added to the contract you will now see a new section called payments appear below the item section. This is where you determine things such as how the contract will be paid, proration, receipt options, and patient agreement requirements.
- Payment - You have a couple options available to you.
- Use Account On File - This is the card vault for this patient. So if you already have a card on file for
them OR would like to add a card for the recurring plan that should also be saved on file then this is
the selection for you. - Account - Now on the next field labeled "Account" you will see a drop down appear with the list of
cards within this patient's account vault. Clicking on the card last 4 will set this card to be billed. If
you don't see the card number or would like to add a new card to the vault for this patient, click Add
New in blue and enter the card information and save. - Receipt - You can also choose when the patient should receive a receipt for this recurring contract.
Receipts are sent after a payment has been successfully made. You can choose to have the receipt
sent: Always , Never, or Once for the initial payment and then never again.

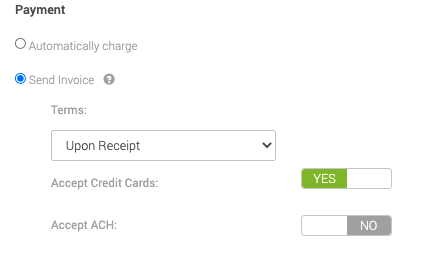
- Send Invoice - If you don't have a card on file or would like to send the patient a copy of the bill
each month for them to pay at their own convenience then "Send Invoice" is the best choice. When
sending an invoice you will see another option appear just below for what payment methods you
would like to accept. In this example it shows "Accept Credit Cards" is set to Yes. This means that
each time this bill is sent to the patient it will have an option for them to make a payment directly on
the emailed receipt. When they go to make a payment they can pay you with a credit card. If you
don't want your patient to have the ability to pay their recurring bill through a link and you would
rather they call you or submit their payment manually simply move "Accept Credit Card" to No.
Prorate 1st Invoice - If you don't want to bill your patient for a full cycle and would like to prorate for the remaining days left until the next full payment simply check the box to the left of the Prorate option. This will automatically calculate the amount of days left until the next scheduled payment (based on the schedule you selected above) and calculate the patient's first payment. This payment will be automatically billed on the start date of the recurring contract.
Request Patient Agreement - Some companies require their patients to agree to having their card on file as an additional security measure to prove that a recurring plan wasn't set up without the patient's approval. With that being said PayRight allows you to do just that just by selecting Yes next to Request Patient Agreement (found at the bottom of the payment section on the recurring plan). Please note if you don't see this option it is due to your invoice/recurring settings being set to No.
Once the recurring plan/contract is saved the email shown below (on the left) will be sent to the patient.
When they click on the green button it will take them to the screen shown in the image below (on the right) where they will either confirm the card on file that you selected or enter their own card they would like to keep on file. Next they will agree that they approve the recurring charge on this card. Once that is complete the recurring plan will mark an event in history to show you the patient agreed and the billing process will begin.
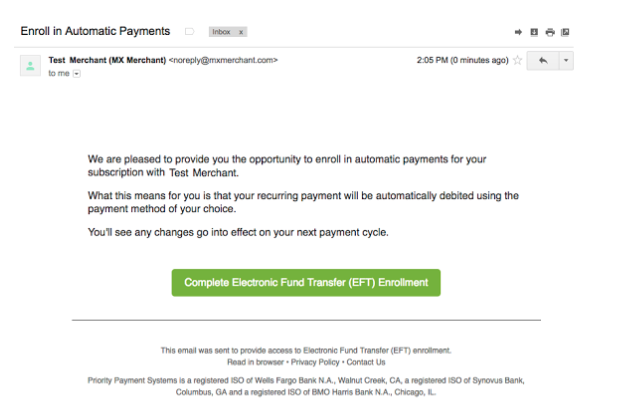
Please note if the patient does not agree to the email the contract will remain in a pending status until the patient agrees or the contract is cancelled.
Buttons
The buttons at the bottom of the invoice (also pictured below) allow additional flexibility with the invoicing capability.
- Cancel - Completely delete this contract
- Save - Once clicking Save the contract will become active and start billing on the next billing cycle.

VIEW
To see more information on an existing contract click on the contract number within the list view of the Recurring page. Doing so will take you to the contract preview shown in the image below.
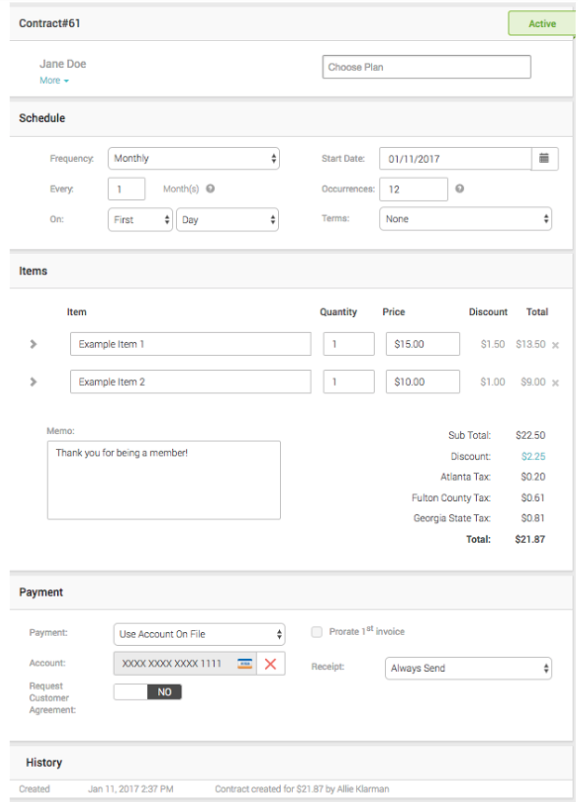
EDIT
In this view you can make any changes that are needed to the contract. Just make sure to click the green save button in the upper right of the screen once you are done and the changes will be in effect for the next billing cycle
PAUSE OR CANCEL A CONTRACT
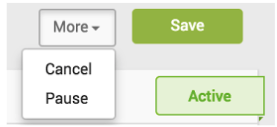
To pause or cancel a contract you must be in the contract view (please see the view section above for more information) once you are there you will see two buttons at the top: a More button and a Save button.
Clicking on the More button will show two options:
- Cancel - This is the equivalent to voiding a recurring plan. Once in a Cancelled state, no further action is available and is now for reporting or history events only
- Pause - This will stop all payments while in a paused status. The contract will not pick back up on payments until it is manually reactivated. To manually reactivate simply click on the contract view and click the Activate button found at the top. *Please note if you have occurrences for a recurring plan they will not be taken into consideration while the contract is paused, once reactivated it will still run for the remaining attempts outstanding for the occurrences.
CHANGE PAYMENT
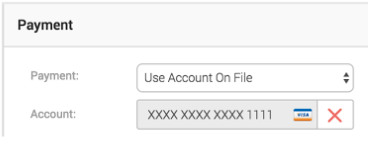
If you need to change the card that is being billed on a recurring plan you can do so by clicking the red x found to the right of the card shown in the image to the right. Once you click the x you can choose another card from the patient's vault or add a new card. Adding a new card to a contract will apply it to the recurring plan and add it to the patient's account vault for you.
Batches
To view a list of your batches select payments from the left hand menu, across the top of the page select the batches tab.
WHAT YOU'LL SEE
Here you will see a list of all your batches with the following information:
- Batch # - system generated
- Tender - card, cash, check, or ACH. Transactions are divided into separate batches based on their tender type. All card transactions will be in one batch, cash in another and so on.
- Sales - the number of sale transactions within the batch
- Sale - total dollar amount of sale transactions within the batch
- Refunds - the number of refund transactions within the batch
- Refund - total dollar amount of refunds transactions within the batch
- Net - total number of all transactions (both sale and refund) within the batch
- Net amount - sale dollar amount less the refund dollar amount within the batch
- Opened - date and time stamp of when the batch was opened or when the first transaction was added automatically
- Closed - date and time stamp of when the batch was closed. A batch can be manually closed by a user or automatically closed by specifying a time in payment settings
An open batch is flagged with a green icon on the right side of the batch number
SEARCH, FILTER, AND EXPORT
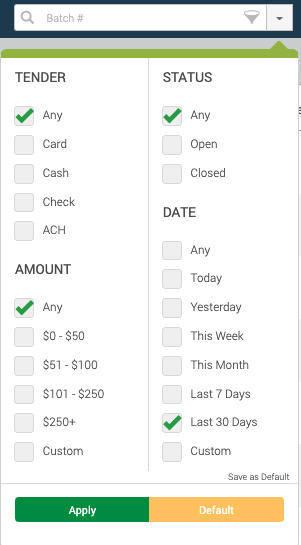
To locate a specific batch use the search box in the upper right. To search, simply type the batch number you are looking for and hit enter.
To access the filter, select the down arrow to the right of the search box. Select the criteria you want to filter on and click Apply. Please note, these filters will only be applied if you click the green Apply button at the bottom of the display, clicking outside the box will cancel your changes.
To reset your search criteria click default and the Apply button. If you want to set your own defaults check the boxes you would like to filter on, then click Save as Default in the lower right. Now whenever you come to the batches page, your filter options will already be automatically applied (this can be used for any of the filters).
To the right of the filter you will notice that there is also an export button that will export the current search and filter you have set into an excel spreadsheet.
BATCH VIEW
To view more information about a specific batch simply click on the green text under the batch # column. Doing so will take you to the batch view in the image below.
The batch view gives you a summary of the payments within the batch as well as a full list of all transactions.

Summary
Most of the summary field is information that was already provided in the list view, however there are some additions to this data. Here you will see the following fields:
- Sale - number of sale transactions and total dollar amount
- Refund - number of refund transactions and total dollar amount
- Tip - total tip dollar amount. This is only shown if the payment was taken on MX™ Express app
and tip was applied during a card transaction - Net - total sales dollar amount less total refunds dollar amount. Please note tips are not included
in this total - Opened - date and time stamp of when the batch was opened or when the first transaction was
added automatically - Closed - date and time stamp of when the batch was closed. A batch can be manually closed by
a user or automatically closed by specifying a time in payment settings - Closed By - if the batch was manually closed it will show you the name of the user who closed
the batch manually. If you use auto close (found in payment settings) to automatically close your
batch at a specific time, you will see Autoclose instead of a team member's name. - Card break down - in card batches only you will see a breakdown of the card type and their total
transaction amounts to the right of the summary section.
Transaction List
This is the same layout and functionality that you saw on the payments screen. This section shows you a full breakdown of all the transactions that make up this batch. To view more information on each transaction, simply click on the green text under the reference column. Doing so will show you a pop up with additional payment details.
MANUALLY CLOSE A BATCH
To manually close a batch you must be in the batch view of an open batch. Once you are there you will see the green Close Batch button to the right of the page. Clicking that will ask for a confirmation and the batch will be closed.

Reports
Reports are broken up into boxes or tiles based on the app they are associated with. Base reports are any reports that come with PayRight(before you install any apps within the marketplace app store).
You may see additional reports on your screen in other boxes or tiles. The word at the top of the box tells you which app these reports are connected with. To see more information on these reports click on the Related Topics section below.
Batch Report
The Batch report (previously known as the Settlement Report) shows all the batches, by date, from the merchant account. Select Reports on the left hand menu to view a list of all reports, within the Base box or tile select Batch.
WHAT YOU'LL SEE
The summary at the top displays with:
- Sales - the transaction count and total amount of all sales for the time period selected
- Refund - the transaction count and total amount of all refunds for the time period selected
- Net - the total transaction count and sum amount of all sales and refunds for the time period
selected
BATCH DETAIL
When viewing the report you will see a full breakdown of all the batches that were settled for the time period selected in the filter.
Each batch displays with:
- Date - date the batch was settled
- Batch Number - systematic number to uniquely identify each group of transactions
- Type - how the funds were processed. Direct Funded, 3rd Party Funded, and the net of the two (if
there was more than one type) - Sales Count - number of sale transactions processed
- Sales Amount - total amount of sale transactions processed
- Refund Count - number of refunded transactions processed
- Refund Amount - total amount of refunded transactions processed
- Net Count - number of total transactions processed
- Net Amount - sum of sales and refunds processed
What are types?
The type refers to how the transaction was processed
- Direct Funded - transactions processed by PPS.
- 3rd Party Funded - transactions such as cash and check tenders that were closed out in a batch but
did not go through PPS.
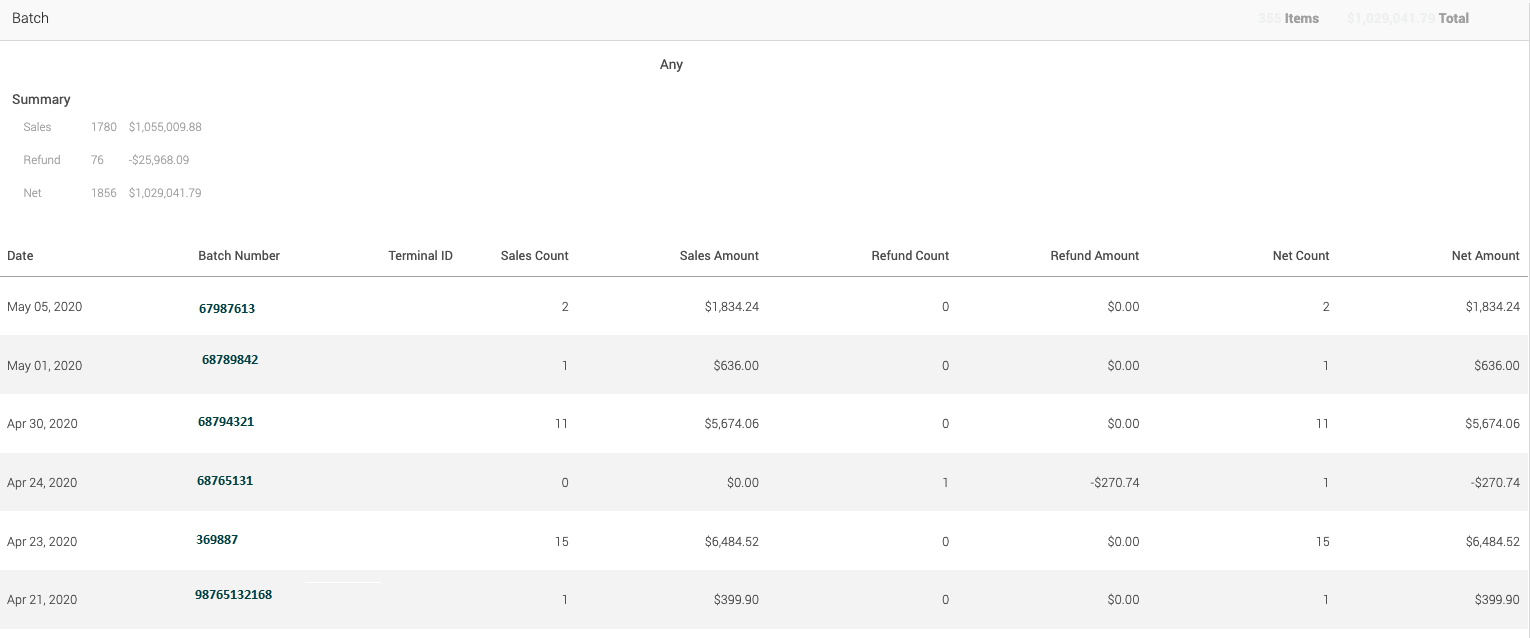
TRANSACTION DETAIL
To view information on a specific payment within the batch simply click on the green text under the Clearing Reference column. This will show you yet another page which displays even more information regarding the transaction shown in the image below. The Summary at the top displays the batch number centered at the top as well as a breakdown of the transaction count and total amount for each card type present within the batch.

On this new view you will see the following columns:
- Type - if the payment was a sale or a refund
- Card - the card type: Visa, MasterCard, American Express, or Discover will show here
- Account - last 4 of the card number
- Auth Code - unique code provided for the payment during confirmation of funds
- Amount - total dollar amount of the sale
SEARCH, FILTER, EXPORT, AND PRINT
To locate a specific batch or payment use the search box in the upper right. To search, simply type the reference number, authorization code, Invoice number, or patient name you are looking for and hit enter.
To access the filter, select the down arrow to the right of the search box. Select the criteria you want to filter on and click Apply. Please note, these filters will only be applied if you click the green Apply button at the bottom of the display, clicking outside the box will cancel your changes.
This report is defaulted to show you the last 30 days. To reset your search criteria click default and the Apply button. If you want to set your own defaults check the boxes you would like to filter on, then click Save as Default in the lower right. Now whenever you come to the Batch report, your filter options will already be automatically applied (this can be used for any of the filters).
To the right of the filter you will notice that there is also an export button that will export the current search and filter you have set into an excel spreadsheet and download it to your computer.
To the right of the export button is a print button that will take you to a new page to see a preview, if you're happy with it, click the print button in the upper right of the screen to select which printer you'd like to print to.
Transactions Report
The Transaction report shows the same information that can be found on the batch report when you drill into a batch. This report just shows the transaction level detail so if you're tired of clicking around to find a payment this report is for you! Select Reports on the left hand menu to view a list of all reports, within the Base box or tile select Transactions.
WHAT YOU'LL SEE
The summary at the top displays the time period centered at the top as well as a transaction count and amount by card brands present within the timeframe selected.

TRANSACTION DETAIL
This is a full list of all transactions, the batch number is indicated as a column on this report rather than a sum that you have to click into like you do on the Batch report. Please note it is the same information that is found on the batch report, just an easier way to view the data. The transaction detail is shown in the image below.
On this new view you will see the following columns:
- Date - date the batch was settled
- Batch Number - systematic number to uniquely identify each group of transactions
- Terminal ID - if the transaction was made on a stand alone terminal the ID will appear here (As of
now this is only available for TSYS) - Transaction Type - if the payment was a sale or refund
- Card Type - the card type: Visa, MasterCard, American Express, or Discover will show here
- Last 4 - card number last 4
- Amount - total dollar amount of the transaction
- Auth Code - unique code provided for the payment during confirmation of funds
- Transaction Date - date the transaction was taken
SEARCH, FILTER, EXPORT, AND PRINT
To locate a specific batch or payment use the search box in the upper right. To search, simply type the Last 4, authorization code, or terminal ID you are looking for and hit enter.
To access the filter, select the down arrow to the right of the search box. Select the criteria you want to filter on and click Apply. Please note, these filters will only be applied if you click the green Apply button at the bottom of the display, clicking outside the box will cancel your changes.
This report is defaulted to show you the last 30 days. To reset your search criteria click default and the Apply button. If you want to set your own defaults check the boxes you would like to filter on, then click Save as Default in the lower right. Now whenever you come to the Transaction report, your filter options will already be automatically applied (this can be used for any of the filters).
To the right of the filter you will notice that there is also an export button that will export the current search and filter you have set into an excel spreadsheet and download it to your computer.
To the right of the export button is a print button that will take you to a new page to see a preview, if you're happy with it, click the print button in the upper right of the screen to select which printer you'd like to print to.
Chargebacks Report
A chargeback (reversal) is a form of patient protection provided by the issuing banks, which allows cardholders to file a complaint regarding fraudulent transactions on their statement. If you processed a transaction that was claimed as a chargeback you will find them here. Select Reports on the left hand menu to view a list of all reports, within the Base box or tile select Chargebacks.
WHAT YOU'LL SEE:
Each chargeback displays with:
- Case Number - System generated number to uniquely identify the case opened by the patient to dispute the payment
- Dispute Date - date of the chargeback dispute
- Reason - if a reason was provided as to why the chargeback was submitted it will be shown here
- Transaction Reference - system generated number to uniquely identify each transaction, this number was assigned when the initial transaction was made
- Last 4 - the last 4 digits of the card number charged
- Amount - total amount of the chargeback
- Transaction Date - date of the original payment
- Resolution To - who won the chargeback dispute either the patient or merchant. Currently this is
only available for TSYS.

FILTER AND EXPORT
To access the filter, select the down arrow to the right of the search box. Select the criteria you want to filter on and click Apply. Please note, these filters will only be applied if you click the green Apply button at the bottom of the display, clicking outside the box will cancel your changes.
This report is defaulted to show you the last 30 days. To reset your search criteria click default and the Apply button. If you want to set your own defaults check the boxes you would like to filter on, then click Save as Default in the lower right. Now whenever you come to the Chargeback report page, your filter options will already be automatically applied (this can be used for any of the filters).
To the right of the filter you will notice that there is also an export button that will export the current search and filter you have set into an excel spreadsheet.
Expired Cards
The expired cards report shows all the cards you have stored in the account vault. The goal of this report is to give you a full list of all the cards in the vault as well as the patient name and their contact information so if you see a card is about to expire you can update it prior to the expiration. This can be important if you are a heavy user of recurring billing.
Please note you can manage your patients stored cards by clicking on patients in the left hand menu, clicking on a patient name and then clicking on the account vault tab.
WHAT YOU'LL SEE
Select Reports on the left hand menu to view a list of all reports, within the Base box or tile select Expired Cards.
Each entry displays with:
- Patient Name - The name of the patient on this card is associated with PayRight.
- Card Holder - More often than not this will be the same as the patient name but this is the name that displays on the physical card.
- Primary Phone/Email - The primary contact (if there is one) associated with this patient's PayRight record. This should help with reaching out to the patient for updated card information if needed.
- Last 4 or Card - The card type and last 4 of the card on file.
- Expiration Date - Date the card is set to expire.
SEARCH, FILTER, AND EXPORT
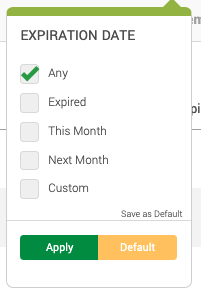
To locate a specific card vault use the search box in the upper right. To search, simply type the patient name, account holder, or last 4 of the card you are looking for and hit enter.
To access the filter, select the down arrow to the right of the search box. Select the criteria you want to filter on and click Apply. Please note, these filters will only be applied if you click the green Apply button at the bottom of the display, clicking outside the box will cancel your changes.
Please note filters can be applied along with search to further narrow the payment results.
To reset your search criteria click default and the Apply button. If you want to set your own defaults check the boxes you would like to filter on, then click Save as Default in the lower right. Now whenever you come to the Expired Card report, your filter options will already be automatically applied (this can be used for any of the filters).
To the right of the filter you will notice that there is also an export button that will export the current search and filter you have set into an excel spreadsheet.
UPDATING CARDS
When viewing this report you will notice the common theme throughout PayRight is that if there is green text it means you can click on it. The green text in this report is on the last 4 of the card number (second to last column).

The purpose of this report is to use the filter to see which cards in the account vault are about to expire. If you notice one is about to expire you can use this report to view the patient name, their card, and their expiration date of the card. The primary contact information is added on there as well to help you reach out to the patient without having to leave the report. Better yet, when you get in touch with them and are ready to update the information just click on the corresponding card last 4.
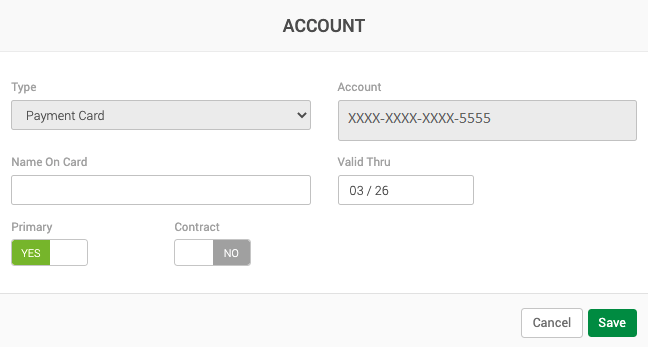
After you click the card last 4 the pop up to the left will appear with the following info that can be updated:
- Name on card - What name appears on the physical card
- Valid Thru - or expiration date
- Primary - Yes/No. If you like to keep this their primary card for their account
- The following can not be changed:
- Type - Payment Card (just telling you it is a credit card)
- Account - only the last 4 of the card will show the rest will be an x's for security purposes. If you need to delete this card you will need to go to the patient record.
- Contract - Yes/No. This lets you know if this card is associated with an active contract or not.
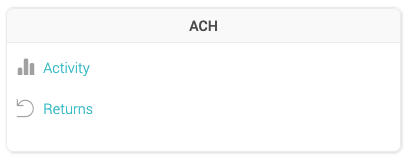
The ACH.COM app comes with two reports. The Activity report which shows all ACH transactions made within the specified time period along with additional detail and the Returns report for any ACH transactions that weren't processed successfully as well as the return reason.
ACTIVITY
With the Activity report you can quickly see all of the information you need regarding the ACH transaction and it's settlement without wondering when the money will hit your account.
Below are the columns that you will find when viewing this report:
- Processing Date
- Record Type
- Amount
- Count
- Transaction Count
- Effective Entry Date
- Settlement Date

Filter and Export
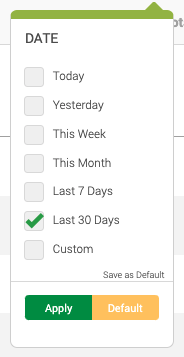
To access the filter, select the down arrow to the right of the search box. Select the criteria you want to filter on and click Apply. Please note, these filters will only be applied if you click the green Apply button at the bottom of the display, clicking outside the box will cancel your changes.
This report is defaulted to show you the last 30 days. To reset your search criteria click default and the Apply button. If you want to set your own defaults check the boxes you would like to filter on, then click Save as Default in the lower right. Now whenever you come to the Activity report, your filter options will already be automatically applied (this can be used for any of the filters).
To the right of the filter you will notice that there is also an export button that will export the current search and filter you have set into an excel spreadsheet.
RETURNS
The Returns report shows you any instance when an ACH payment didn't actually process. This report gives you detailed information for the original payment, and the reason for why the transaction didn't process.
Below are the columns that you will find when viewing this report:
- Company Name
- Receiving Name
- Amount
- Debit/Credit
- Debit Amount
- Credit Amount
- Return Code
- Return Reason
- Effective Date
- Transaction Date

Filter and Export
To access the filter, select the down arrow to the right of the search box. Select the criteria you want to filter on and click Apply. Please note, these filters will only be applied if you click the green Apply button at the bottom of the display, clicking outside the box will cancel your changes.
This report is defaulted to show you the last 30 days. To reset your search criteria click default and the Apply button. If you want to set your own defaults check the boxes you would like to filter on, then click Save as Default in the lower right. Now whenever you come to the Return report, your filter options will already be automatically applied (this can be used for any of the filters).
To the right of the filter you will notice that there is also an export button that will export the current search and filter you have set into an excel spreadsheet.
Patient/Client Enrollment
Patients are an integral part of all business. PayRight provides a detailed view of the recipients of your goods and services to keep you a bit more "in the know" of your patients spending behavior.
WHAT YOU'LL SEE
patients show all patients both active and non active. To view a list of all patients, click on patients from the left hand menu.
Each patient displays with:
- Name – individual or business name
- Type – person or business
- Status – active or inactive
- Promos – if they have opted in or out of receiving promotions
- Profile – (spend profile) a quick view of your patients spending habits. These profiles can be
changed within patient settings. patient spend profiles are updated nightly to reflect any change in
patient status. - City
- State
- Postal Code
- Primary Contact – email or phone number on file
- patient Number - manually assigned or auto populated
- Last Activity – date and time stamp of the last activity (edit to the patient profile or a payment)
SEARCH, FILTER, AND EXPORT
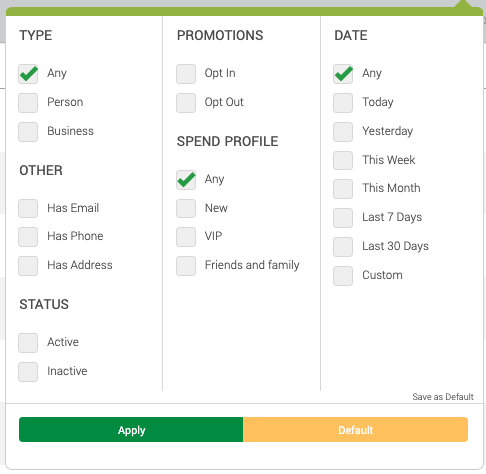
To locate a specific patient use the search box in the upper right. To search, simply type the patient name, city state or postal code you are looking for and hit enter on your keyboard.
To access the filter, select the down arrow to the right of the search box. Select the criteria you want to filter on and click Apply. Please note, these filters will only be applied if you click the green Apply button at the bottom of the display, clicking outside the box will cancel your changes.
To reset your search criteria click default and the Apply button. If you want to set your own defaults check the boxes you would like to filter on, then click Save as Default in the lower right. Now whenever you come to the patient page, your filter options will already be automatically applied (this can be used for any of the filters).
To the right of the filter you will notice that there is also an export button that will export the current search and filter you have set into an excel spreadsheet.
CREATE A NEW patient
To create a new patient simply click the +Add Product button in the upper right hand corner of the Products page.

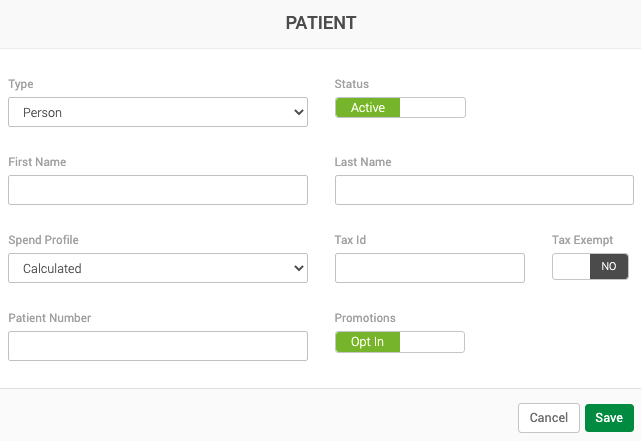
Now you will see the pop up to the left with the following fields:
- Type - here you can select if it is a person or a business that you are creating a record for
- Promotions - Opt In/Opt Out. This is if they would like to receive promotions from your business
- First Name - Required if person is selected
- Last Name - Required if person is selected
- Spend Profile - Defaults to calculated. Based on your patients spending habits it will calculate which
spend profile they represent (spend profiles can be changed in your patient settings) - Tax Id - more often than not, you won't use this but if you collect this information from your patients
it can be entered here - Tax Exempt - Yes/No (defaults to Yes)
- Patient Number - any number you want to assign this specific patient record
- Custom fields - Only available once custom fields have been added within patient Settings
VIEW
To see more information on a patient click on the patient name within the list view of the patient page. Doing so will take you to the patient view in the image below.
You can also access this page after creating a new product and clicking save on the pop up.
The patient view gives you a current snapshot of your patient. Depending on how much information you have entered for your patient record will determine how much you see on this screen.
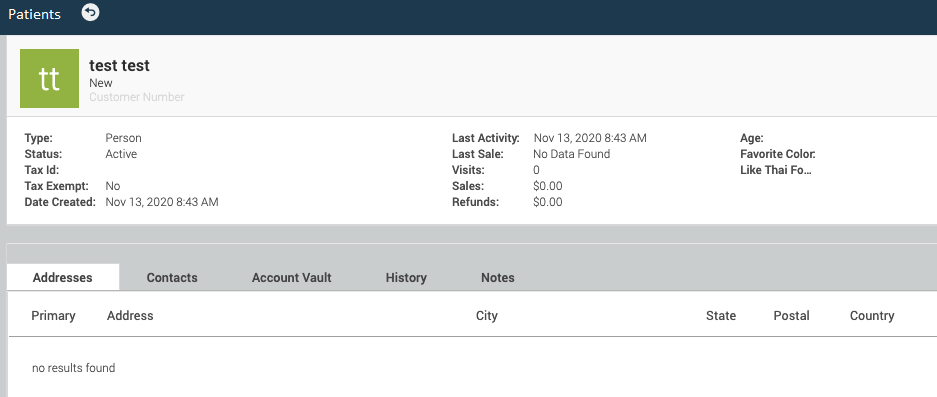
Top section:
- Tile/Photo - If there are letters in this box it is taking either the first 2 letters of the product name. If
there is more than one word in your product name it will take the first letter of the first two words. If
you don't see a tile with letters you may see an image of your product that you already uploaded. - patient Name - Just to the right of the tile in bold
- Spend Profile - To the right of the tile just below the patient name. Based on your patients spending
habits it will calculate which spend profile they represent (spend profiles can be changed in your
patient settings) - patient number - To the right of the tile and just below the spend profile
Middle section:
- Type - if it is a person or a business
- Status - once a patient has a payment associated with them you can no longer delete them.
However, you can set their status as active or inactive to help indicate if they still do business with
you. - Tax Id - more often than not, you won't use this but if you collect this information from your patients
it can be entered here - Tax Exempt - Yes/No (defaults to Yes)
- Date Created - Date and time stamp of when this patient was added to MX™M
- Tax Category - These categories are set up in settings. The tax category selected will be
automatically applied when this item is sold - Last Activity - Date and time stamp of when this patient record was last updated
- Last Sale - Date and time stamp of when this patient last made a purchase
- Visits - Count of how many days the patient has made a purchase at your business
- Sales - Total dollar amount of all of the sales associated with this patient
- Refunds - Total dollar amount of all refunds associated with this patient
- Custom Fields - If you have custom fields created in patient settings you will see them here. You can
have up to 10 custom fields. In the image above Birthday and Quick Notes (found on the right of the
summary section) are a couple examples of what you can use custom fields for.
To edit the information in the Top or Middle Section of the Supplier view page, simply click the blue Edit in the upper right.
Bottom tab section:
- Addresses - Any street or PO box address for this patient. (i.e. Main residence, Work, Vacation
Home, etc.) - Contacts - Any email or phone number for this patient. (i.e. Home, Work, Personal, etc.)
- Account Vault - Credit cards or bank accounts that the patient would like to keep on file for future
purchases - History - Purchase history through Quick Pay payments, invoices, recurring plans, and orders, as
well as products purchased can all be found here - Notes - Additional information you would like to keep track of
EDIT
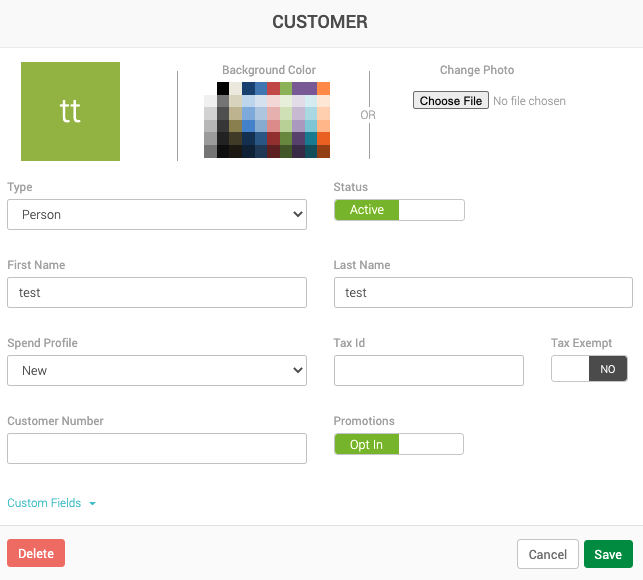
You've probably noticed there are some other fun things that you can do to spice up your patients such as:
- Changing the color - Tile color can be changed by clicking one of the colored boxes under
background color - Add an Image - Adding an image of your patients is helpful for ease of recognition (but... might be
hard to accomplish if you aren't a gym) - Status - Change or update the patient's status to active or inactive
- First Name - Change or update the first name of the patient
- Last Name - Change or update the last name of the patient
- Spend Profile - Manually override the calculation if you need the patient to be in a different group.
- Tax Id - Supplier TIN
- Tax Exempt - Yes or No
- patient Number - Custom unique number to help identify the supplier
- Custom Fields - Click on the blue Custom Fields text toward the bottom of the pop up to
change/update responses
Editing information within the tabs in the lower section can be accomplished by clicking the desired tab then clicking on the text in green under each tab.
If you don't have any information under the tab or want to add more information, simply click on the green +Add button that correlates to the tab selected.
Addresses
Any locations that you would like to keep readily available, these could be: billing or shipping addresses, home address, work address, vacation home, a PO box, etc. (Use the Label section to add additional information about the address)
- To edit an address click on the green text under the Address column
- To add an address click on the green +Add Address button while you have the address tab
selected.

Contacts
Phone numbers or email addresses that you would like to keep readily available, these could be contacts for their: cell, landline, work, etc. (Use the Label section to add additional information about each contact)
- To edit a contact click on the green text under the Contact column
- To add a contact click on the green +Add Contact button while you have the Contacts tab selected

Account Vault
Credit cards or bank account information that the patient would like you to keep readily available for future payments.
- To edit an account click on the green text under the Account column
- To add an account click on the green +Add Account button while you have the Account Vault tab
selected.

History
When you click on the History tab on patients you will notice that more tabs appear just below it. Here you can see your history for payments, invoices, recurring plans, orders, and products by clicking on the corresponding sub tab.
Payment History - All transactions associated with this patient regardless of the type and status can be found by clicking the History tab and then the sub tab for payments as seen in the image below.
- To view a payment or make a change to the payment click on the green text under the Reference
column (same information found on the main payments page) - To add a new Quick Pay payment that will automatically associate the transaction to this patient,
click on the green +Add Payment button while you have the History and Payment tabs selected.

Invoice History - All invoices associated with this patient regardless of the status can be found by clicking the History tab and then the sub tab for Invoices as seen in the image below.
- To view, add payment or make a change to an invoice click on the green text under the Invoice #
column (same information found on the main invoice page) - To add a new invoice that will automatically be associated with this patient, click on the green +Add
Invoice button while you have the History and Invoice tabs selected.

Recurring History - All recurring plans associated with this patient regardless of the status can be found by clicking the History tab and then the sub tab for Recurring as seen in the image below.
- To view or make a change to a recurring plan click on the green text under the Contract # column
(same information found on the main Recurring page) - To add a new contract or recurring plan that will automatically be associated to this patient, click on
the green +Add Contract button while you have the History and Recurring tabs selected.

Order History - All orders associated with this patient regardless of the statuses can be found by clicking the History tab and then the sub tab for Orders as seen in the image below.
- To view, add payment or make a change to an order click on the green text under the Order #
column (same information found on the main Order page) - To add a new order that will automatically be associated with this patient, click on the green +Add
Order button while you have the History and Orders tabs selected.

Product History - All products this patient has purchased through invoices, recurring plans, and orders will be listed here as well as the total quantity and the last date they purchased each product. This information can be found by clicking the History tab and then the sub tab for Products as seen in the image below.

Notes
These are open fields where you can keep track of purchases, notes on conversations with the patient, past requests, etc.
- To view a note click on the green text under the Author column. Please note only the author of the
note can make changes to an existing note - To add a note ensure you have the note tab selected then click on the green +Add Note button.
Patient/Client File Import
To import existing patients, choose the down arrow in the top right corner.

Next, choose to download the template to review expected data fields and as shown below. This allows you to know which fields can be imported as part of the patient import option.
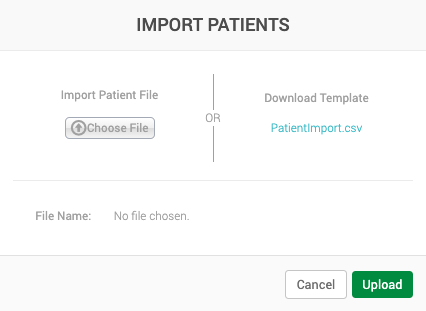
Once uploaded, all Patients/Clients will be visible in the Patient portal.
