Customers
Customers are an integral part of all businesses. MX Merchant provides a detailed view of the recipients of your goods and services to keep you more aware of your customers' spending behavior.
What You'll See
To view a list of all active and non-active customers, click Customers from the left-hand menu.
Each customer displays with:
- Name – individual or business name
- Type – person or business
- Status – active or inactive
- Promos – if they have opted in or out of receiving promotions
- Profile – (spend profile) a quick view of your customers' spending habits. These profiles can be changed within customer settings. Customer spend profiles are updated nightly to reflect any change in customer status.
- City
- State
- Postal Code
- Primary Contact – email or phone number on file
- Customer Number - manually assigned or auto-populated
- Last Activity – date and time stamp of the last activity (edit to the customer profile or a payment)
Search, Filter, and Export

To locate a specific customer use the search box in the upper right. To search, simply type the customer name, city state or postal code you are looking for and hit enter on your keyboard.
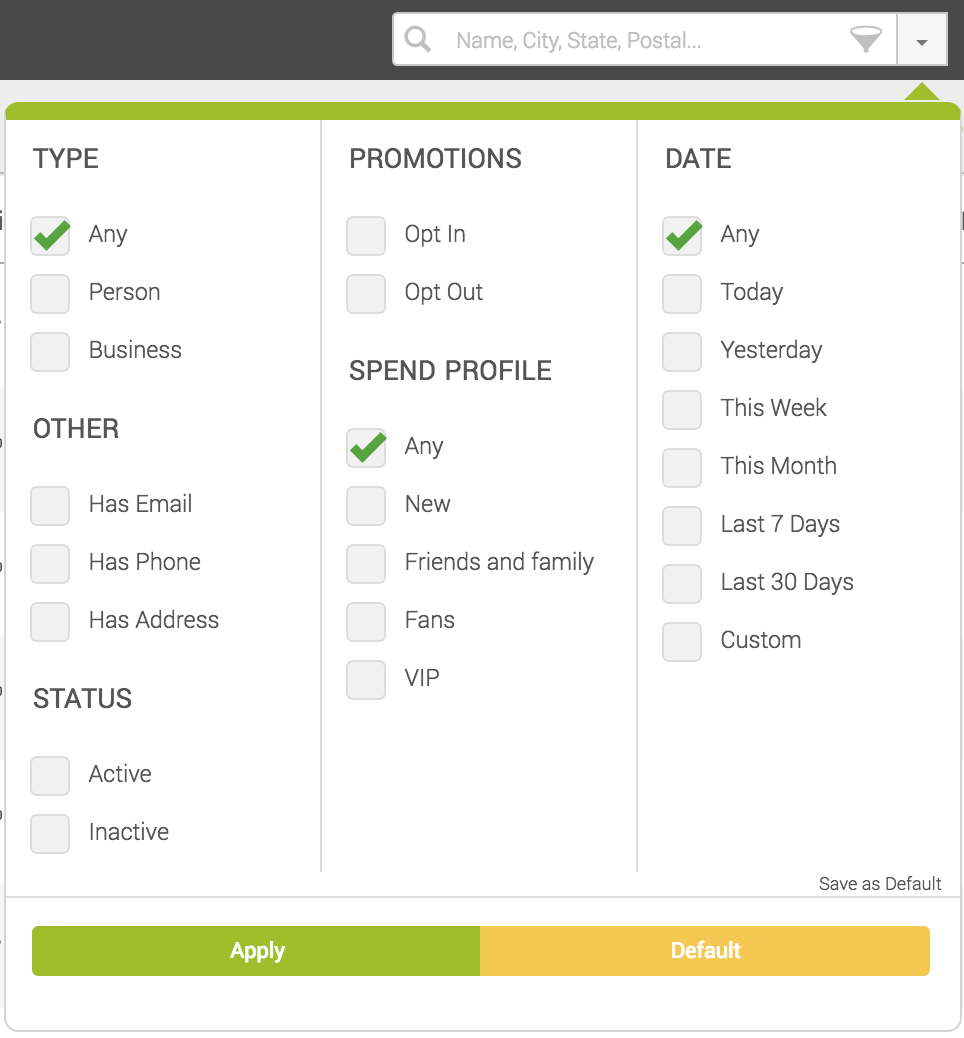
To access the filter, select the down arrow to the right of the search box. Select the criteria you want to filter on and click Apply. Please note, these filters will only be applied if you click the green Apply button at the bottom of the display, clicking outside the box will cancel your changes.
To reset your search criteria click default and the Apply button. If you want to set your own defaults, check the boxes you would like to filter on, then click Save as Default in the lower right. Now whenever you come to the Customer page, your filter options will already be automatically applied (this can be used for any of the filters).
To the right of filter, you will notice that there is also an export button that will export the current search and filter you have set into an excel spreadsheet.
Create a New Customer
To create a new customer simply click the "+Add Customer" button in the upper right-hand corner of the Products page.


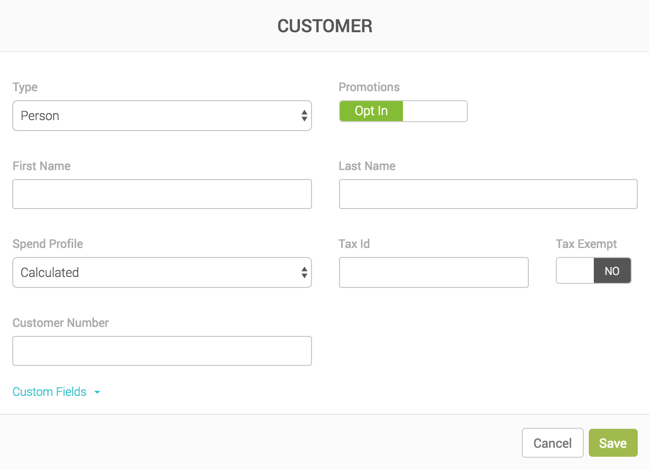
Now you will see the pop up to the left with the following fields:
- Type - here you can select if it is a person or a business that you are creating a record for
- Promotions - Opt-In/Opt-Out. This is if they would like to receive promotions from your business
- First Name - Required if person is selected
- Last Name - Required if person is selected
- Spend Profile - Defaults to calculated. Based on your customers' spending habits it will calculate which spend profile they represent (spend profiles can be changed in your customer settings)
- Tax Id - more often then not you won't use this but if you collect this information from your customers it can be entered here
- Tax Exempt - Yes/No (defaults to Yes)
- Customer Number - any number you want to assign this specific customer record
- Custom fields - Only available once custom fields have been added within Customer Settings
View
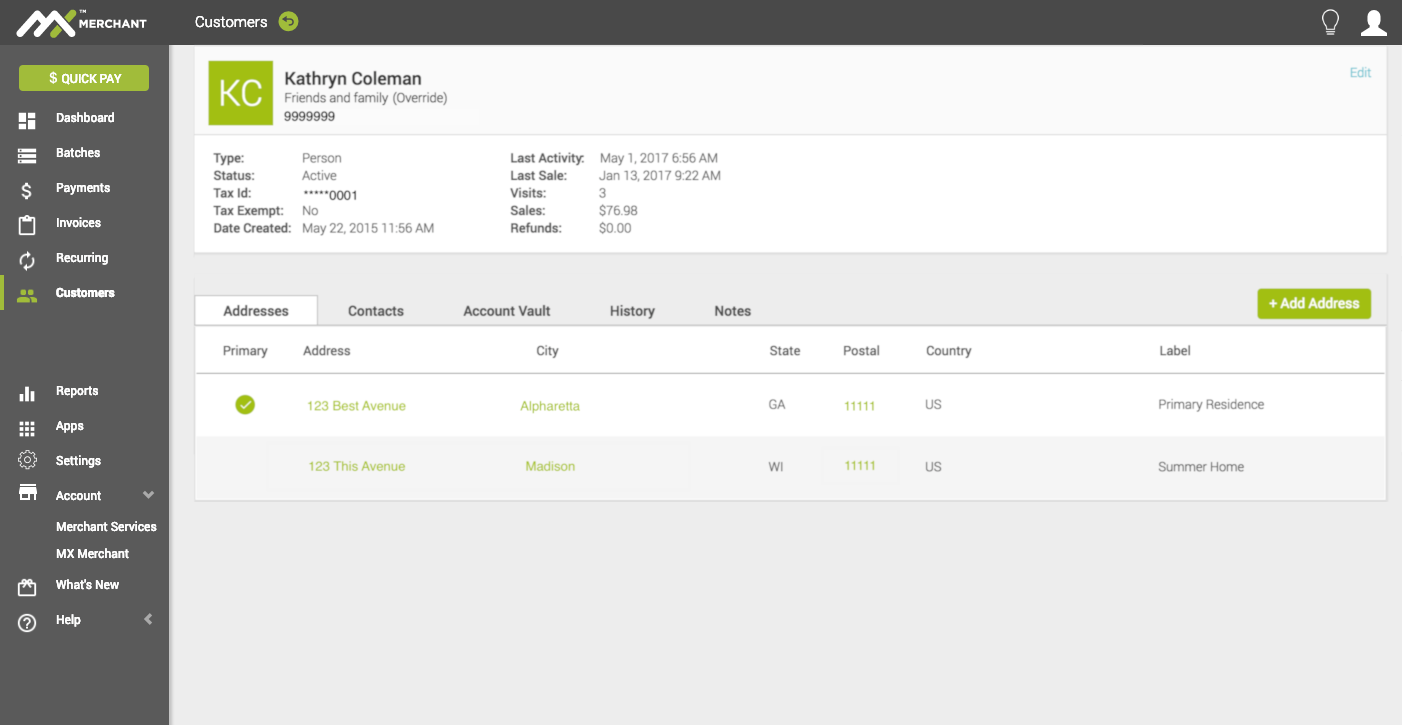
To see more information on a customer click on the customer name within the list view of the customer page. Doing so will take you to the customer view in the image below.
You can also access this page after creating a new product and clicking save on the pop-up.
The customer view gives you a current snapshot of your customer. Depending on how much information you have entered for your customer record will determine how much you see on this screen.

Top section:
- Tile/Photo - If there are letters in this box it is taking either the first 2 letters of the product name. If there is more than one word in your product name it will take the first letter of the first two words. If you don't see a tile with letters you may see an image of your product that you already uploaded.
- Customer Name - Just to the right of the tile in bold
- Spend Profile - To the right of the tile just below the customer name. Based on your customers spending habits it will calculate which spend profile they represent (spend profiles can be changed in your customer settings)
- Customer number - To the right of the tile and just below the spend profile
Middle section:
- Type - if it is a person or a business
- Status - once a customer has a payment associated with them you can no longer delete them. However, you can set their status as active or inactive to help indicate if they still do business with you.
- Tax Id - more often then not you won't use this but if you collect this information from your customers it can be entered here
- Tax Exempt - Yes/No (defaults to Yes)
- Date Created - Date and time stamp of when this customer was added to MXM
- Tax Category - These categories are set up in settings. The tax category selected will be automatically applied when this item is sold
- Last Activity - Date and time stamp of when this customer record was last updated
- Last Sale - Date and time stamp of when this customer last made a purchase
- Visits - Count of how many days the customer has made a purchase at your business
- Sales - Total dollar amount of all of the sales associated with this customer
- Refunds - Total dollar amount of all refunds associated with this customer
- Custom Fields - If you have custom fields created in customer settings you will see them here. You can have up to 10 custom fields. In the image above Birthday and Quick Notes (found on the right of the summary section) are a couple examples of what you can use custom fields for.
To edit the information in the Top or Middle Section of the Supplier view page, simply click the blue Edit in the upper right.
Bottom tab section:
- Addresses - Any street or PO box address for this customer. (i.e. Main residence, Work, Vacation Home, etc.)
- Contacts - Any email or phone number for this customer. (i.e. Home, Work, Personal, etc.)
- Account Vault - Credit cards or bank accounts that the customer would like to keep on file for future purchases
- History - Purchase history through Quick Pay payments, invoices, recurring plans, and orders, as well as products purchased can all be found here
- Notes - Additional information you would like to keep track of
Edit

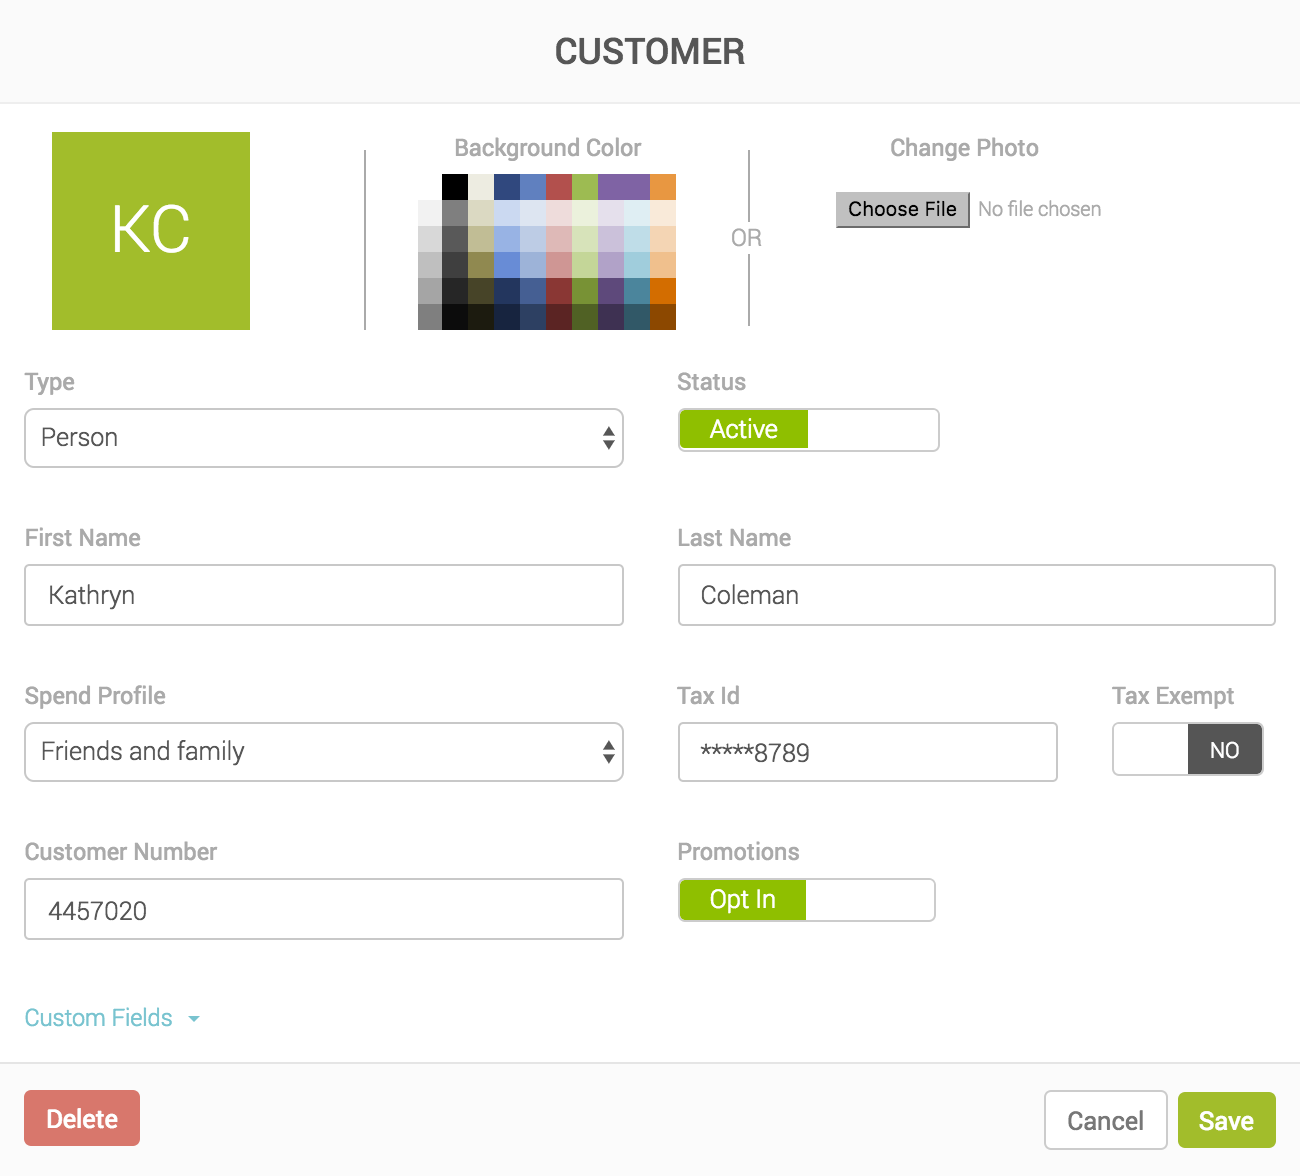
You've probably noticed there are some other fun things that you can do to spice up your customers such as:
- Changing the color - Tile color can be changed by clicking one of the colored boxes under background color
- Add an Image - Adding an image of your customers is helpful for ease of recognition (but... might be hard to accomplish if you aren't a gym)
- Status - Change or update the customers status to active or inactive
- First Name - Change or update the first name of the customer
- Last Name - Change or update the last name of the customer
- Spend Profile - Manually override the calculation if you need the customer to be in a different group.
- Tax Id - Supplier TIN
- Tax Exempt - Yes or No
- Customer Number - Custom unique number to help identify the supplier
- Custom Fields - Click on the blue Custom Fields text toward the bottom of the pop up to change/update responses
Editing information within the tabs in the lower section can be accomplished by clicking the desired tab then clicking on the text in green under each tab.
If you don't have any information under the tab or want to add more information, simply click on the green "+Add" button that correlates to the tab selected.
Addresses
Any locations that you would like to keep readily available, these could be: billing or shipping addresses, home address, work address, vacation home, a PO box, etc. (Use the Label section to add additional information about the address).
- To edit an address click on the green text under the Address column.
- To add an address click on the green +Add Address button while you have the address tab selected.

Contact
Phone numbers or email addresses that you would like to keep readily available, these could be contacts for their: cell, landline, work, etc. (Use the Label section to add additional information about each contact).
- To edit a contact click on the green text under the Contact column
- To add a contact click on the green +Add Contact button while you have the Contacts tab selected.

Account Vault
Credit cards or bank account information that the customer would like you to keep readily available for future payments.
- To edit an account click on the green text under the Account column
- To add an account click on the green +Add Account button while you have the Account Vault tab selected.

History
When you click on the History tab on customers you will notice that more tabs appear just below it. Here you can see your history for payments, invoices, recurring plans, orders, and products by clicking on the corresponding sub-tab.
Payment History - All transactions associated with this customer regardless of the type and status can be found by clicking the History tab and then the sub-tab for payments as seen in the image below.
- To view a payment or make a change to the payment click on the green text under the Reference column (same information found on the main payments page).
- To add a new Quick Pay payment that will automatically associate the transaction to this customer, click on the green +Add Payment button while you have the History and Payment tabs selected.

Invoice History - All invoices associated with this customer regardless of the status can be found by clicking the History tab and then the sub-tab for Invoices as seen in the image below.
- To view, add payment or make a change to an invoice click on the green text under the Invoice # column (same information found on the main invoice page).
- To add a new invoice that will automatically be associated to this customer, click on the green +Add Invoice button while you have the History and Invoice tabs selected.

Recurring History - All recurring plans associated with this customer regardless of the status can be found by clicking the History tab and then the sub-tab for Recurring as seen in the image below.
- To view or make a change to a recurring plan click on the green text under the Contract # column (same information found on the main Recurring page).
- To add a new contract or recurring plan that will automatically be associated to this customer, click on the green +Add Contract button while you have the History and Recurring tabs selected.

Order History - All orders associated with this customer regardless of the statuses can be found by clicking the History tab and then the sub tab for Orders as seen in the image below.
- To view, add payment or make a change to an order click on the green text under the Order # column (same information found on the main Order page).
- To add a new order that will automatically be associated to this customer, click on the green +Add Order button while you have the History and Orders tabs selected.

Product History - All products this customer has purchased through invoices, recurring plans, and orders will be listed here as well as the total quantity and the last date they purchased each product. This information can be found by clicking the History tab and then the sub tab for Products as seen in the image below.

Notes
These are open fields where you can keep track of purchases, notes on conversations with the customer, past requests, etc.
- To view a note click on the green text under the Author column. Please note only the author of the note can make changes to an existing note.
- To add a note ensure you have the note tab selected then click on the green +Add Note button.

Videos
Updated almost 6 years ago
