Settings
There are multiple Settings that become available when the Invoice app is installed. They are as follows:
- Invoice (Invoice and Recurring)
- Sales Tax
- Discounts
Creating invoices and recurring plans are tedious enough, so why not set some helpful defaults and templates to make that process even quicker!
Invoice and Recurring settings can be found by clicking on Settings in the left-hand menu and then selecting the invoice tile which is shown in the image to the left.
What You'll See
This page is broken up by the following tabs across the top:
- Invoice
- Recurring
Invoice Settings
Invoice settings are broken up into the following sections:
- Default Terms
- Sending Invoices (Click2Pay links)
- Reminder Notifications
Default Terms

Default terms will appear each time a new invoice is created. Even though a default is selected they can be overridden when adding a new invoice.
Sending Invoices (Click2Pay)
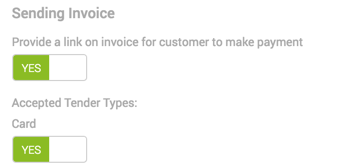
Providing a link on the invoice for a customer to make a payment, this was previously referred to as Click2Pay. This is also a default option. When sending an invoice, use the Yes/No toggle to choose wither you would like to provide a payment link on a sent invoice. This payment link will allow a customer to click and enter their card information to pay the outstanding balance.
If you choose to provide a link you will need to select what tender types you will allow the customer to pay with. This can also be updated on the invoices if you don't want to allow the default.
Reminder Notifications
Reminder notifications help inform your customers prior to a scheduled due date or after one has passed and payment has still not been made.
Prior to payment due date - If you would like to send a reminder to your customers prior to their invoice or recurring plan being due, enter the number of days prior to the due date that you would like them to receive the notification. If you don't want to send them a notification prior simply enter a zero in the first box.
After payment due date - If you would like to automatically send a reminder to your customers if their invoice or recurring contract is past due, enter the number of days after it becoming past due that you would like to send the notification. If you don't want to send them a notification on past due payments simply enter a zero in the second box.

Recrurring Settings
Recurring settings are broken up into the following sections:
- Send Customer Authorization
- Schedule Defaults
- Recurring Plan Templates
Send Customer Authorization
Set your default preference for whether or not you would like to require your customers to authorize or approve a recurring charge to their card/account prior to actually activating it in MX™ Merchant. To do so use the Yes/No toggle found in the image to the right. Please note this setting is a default and can be changed on the recurring contracts as well

Schedule Defaults
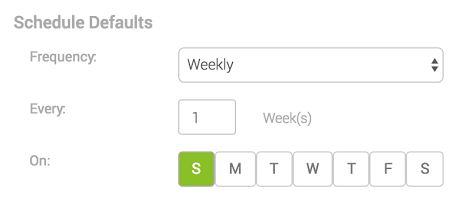
Set your recurring plan schedule to your most commonly used payment schedule to help reduce recurring contract setup time. Please note this is just a default and can be changed on the recurring contracts as well.
Recurring Plan Templates
Recurring templates can be used for heavily used recurring subscriptions that you charge your customers. Basically, you fill out a recurring contract just as you would for a customer, give it a name that is fitting for the charges and save. Now when you go to create a new recurring plan for a customer just enter the template name and it will pre-fill all of this information for you which saves a ton of time and lets you move on to the next customer much quicker.
To create a new plan template simply click the green +Add Plan button.

Now you will see the pop-up below with the following fields:
- Plan Name - This is the name that you will need to type in on the contract to pull up this template.
- Schedule - Frequency the payments will need to run
- Occurrences - How many times you want this contract should bill the customer. Leave it blank (shows Unlimited) if you want them to continue until you manually cancel the contract.
- Terms - If you would like to give your customers x number of days to pay the recurring plan after the scheduled date.
- Items - List out the items that should appear, qty, price. Then click the chevron (right arrow) to the left of the line item to add tax and line item discounts.
- Memo - Custom field for any information you would like the customer to see.
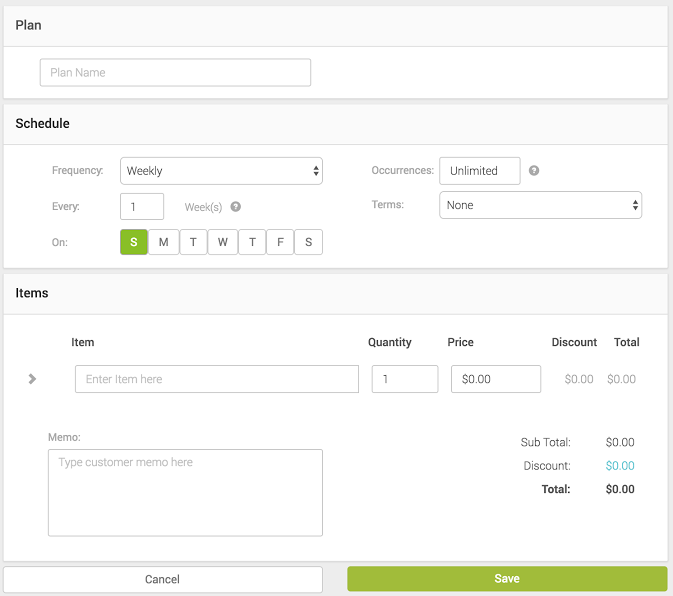
Don't forget to click Save once you are done with this recurring template.
Sales Tax
Once the Invoice app is installed you will also see the Sales Tax tile within the Settings page. Click on this tile to manage your taxes and categories.
The Sales Tax Settings can be found by clicking Settings on the left-hand menu. When the tiles appear, look toward the bottom.
What You'll See
Each existing tax displays with:
- Tax Name - This is the name of the tax rate being applied at the time of checkout
- Description - An extra place to provide more information on the tax rate
- Rate % - The rate that is being charged for this tax
- Categories - The group or groups that this tax rate belongs to. Categories are used as a way to speed up adding taxes to your invoices/recurring plans/orders.
Create a new Tax Rate

To create a new tax rate simply click the +Add Tax button in the upper right-hand corner of the page.
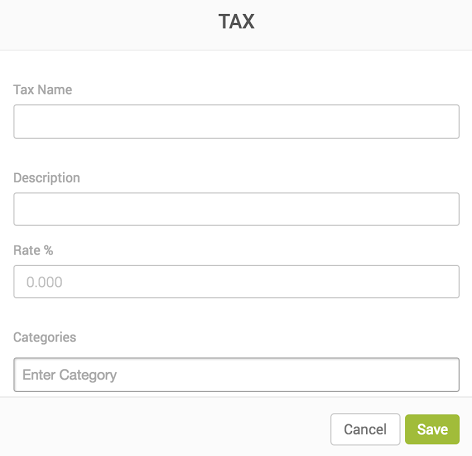
Now you will see the pop-up below with the following fields:
- Tax Name - This is the name of the tax rate being applied at the time of checkout. This is visible to the customers on their receipts so make sure this describes exactly what taxes they are paying for.
- Description - An extra place to provide more information on the tax rate. This is not seen by customers and is just an extra and optional field for information.
- Rate % - The rate that is being charged for this tax
- Categories - The group or groups that this tax rate belongs to. Categories are used as a way to speed up adding taxes to your invoices/recurring plans/orders. For example, you can group together your sales tax rate, county, and state by adding the same category name on each of these tax rates. Now when you go to the order and need to quickly add them you will select this category and it will apply all the tax rates that are associated with the category. If you choose not to assign a tax category it will automatically be assigned as the default.
View and Edit a Tax Rate
To see more information on a tax rate click on the tax name within the list of taxes. Doing so will open a pop-up with all of the information. If you make any changes make sure to click on the Save button at the bottom of the pop-up in order for them to take effect.
Discounts
Once you have the Invoice app installed you will also see the Discount tile within the Settings page. Click on this tile to manage your item, tag, order, and category level discounts.
What You'll See
Each existing discount displays with:
- Discount Name - Any name you would like to use in order to easily reference the discount at time of checkout
- Discount Amount - This can be a percentage or a dollar amount. How much should be taken from the total or item original price
- Level - What type of discount is it, an item level, order level, items within a collection or tag
- Approval - If any user role can apply this discount or if it needs to be approved by a supervisor role prior to being added
- Automatic - If the discount should be applied automatically if the proper criteria for the discount are met.
- Start Date - You can add time restrictions on discounts or leave them as never expiring
- End Date - You can add time restrictions on discounts or leave them as never expiring
- Barcode - System generated or manual barcode number
Create a new Discount

To create a new discount simply click the +Add Discount button in the upper right-hand corner of the page
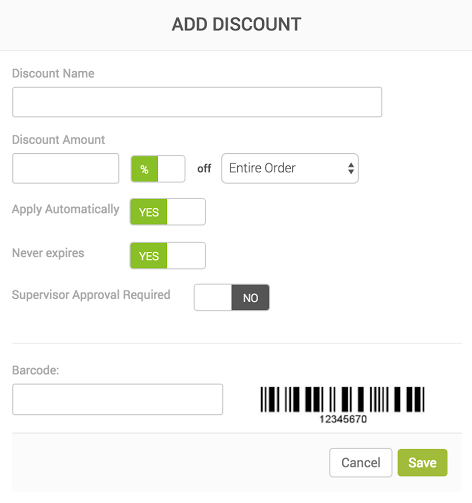
Now you will see the pop-up below with the following fields:
- Discount Name - The discount name is not seen by the customers and can be any name you wish to use in order to easily reference the discount at time of checkout
- Discount Amount - This can be a percentage or a dollar amount. How much should be taken from the total purchase or item original price
- Level - Determine if users are allowed to apply this discount to which of the following:
- Entire order - regardless of the number of items it will be applied to the total balance
- Item - any item/product/quick add within a purchase can use this discount
- Tag - any item/product that has the tag selected can use this discount
- Collection - any item/product that is within the collection selected can use this discount
- Automatic - If you don't want to remember to select this discount you can choose to apply automatically if the proper criteria for the discount are met
- Never Expires - Yes means that this discount has no start or end date and can be used at any time. An example would be a Military discount. If you select No you can select a start date and end date. An example would be a Labor Day discount.
- Supervisor Approval Required - Yes if you would like a clerk to be prompted for supervisor approval in order to apply this discount. No, if you would like any of your users to have the ability to add this discount
- Barcode - System generated or manual entry if you would like to provide your own barcode number for your records.
Search and Filter
To locate a specific discount use the search box in the upper right. To search, simply type the discount name you are looking for and hit enter.
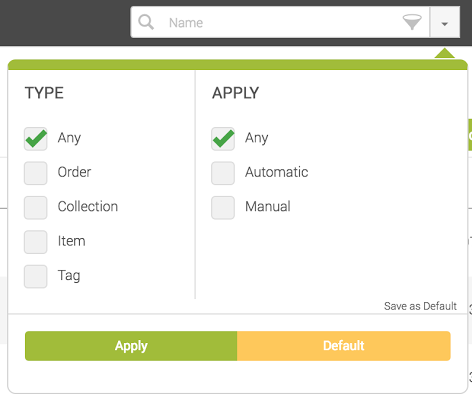
To access the filter, select the down arrow to the right of the search box. Select the criteria you want to filter on and click Apply. Please note, these filters will only be applied if you click the green Apply button at the bottom of the display, clicking outside the box will cancel your changes.
To reset your search criteria click default and the Apply button. If you want to set your own defaults, check the boxes you would like to filter on, then click Save as Default in the lower right. Now, whenever you come to the discounts page your filter options will be automatically applied (this can be used for any of the filters).
View and Edit a Discount
To see more information on a discount click on the discount name within the list of discounts. Doing so will open a pop-up with all of the information. If you make any changes make sure to click on the save button at the bottom of the pop-up in order for them to take effect.
Updated over 5 years ago
