Invoicing
If you are in need of invoicing your customers with line item detail and possibly the use of payment terms, then the Invoice App is for you! By selecting the invoice page from the left-hand menu, you will find a list of all invoices created through MX™ Merchant.
What You'll See
Invoices show all invoices regardless of their status. To view a list of all invoices click on Invoices in the left hand menu.
Each invoice line displays with:
- Invoice # - System generated invoice number each time an invoice is created
- Customer - The name of the customer the invoice was sent to
- Total - Total amount that was billed to the customer through the invoice (this total includes tax and discounts)
- Status - Automatically set based on the remaining balance on the invoice. (Statuses: Draft, unpaid, partially paid, paid, past due, cancelled)
- Invoice Date - Date invoice was sent to the customer
- Due Date - The date in which payment from customer is due by
- Terms - If there were any terms allowed on the invoice (Term options: custom date, upon receipt, net 15, 30, 60, 90)
Invoice Status
 A draft invoice. This invoice has not been sent to the customer and can still be edited.
 An unpaid invoice. This invoice has been sent to the customer and has an outstanding balance.
 A partially paid invoice. A payment is associated with the invoice but there is still an outstanding balance.
 A paid invoice. The invoice has been fully paid.
 A past due invoice. This invoice has a remaining balance and a due date that has past.
 A canceled invoice. No further action available, this invoice has been voided and is for record purposes only.
Search, Filter and Export
To locate a specific invoice use the search box in the upper right. To search, simply type the invoice # or customer name you are looking for and hit enter.

To access the filter, select the down arrow to the right of the search box. Select the criteria you want to filter on and click Apply. Please note, these filters will only be applied if you click the green Apply button at the bottom of the display, clicking outside the box will cancel your changes.
To reset your search criteria click default and the Apply button. If you want to set your own defaults, check the boxes you would like to filter on, then click Save as Default in the lower right. Now whenever you come to the Invoice page, your filter options will be automatically applied (this can be used for any of the filters).
To the right of filter, you will notice that there is also an export button that will export the current search and filter you have set and convert it into an excel spreadsheet.
Create a New Invoice
To create a new invoice simply click the +Add Invoice button in the upper right-hand corner of the Invoice page.

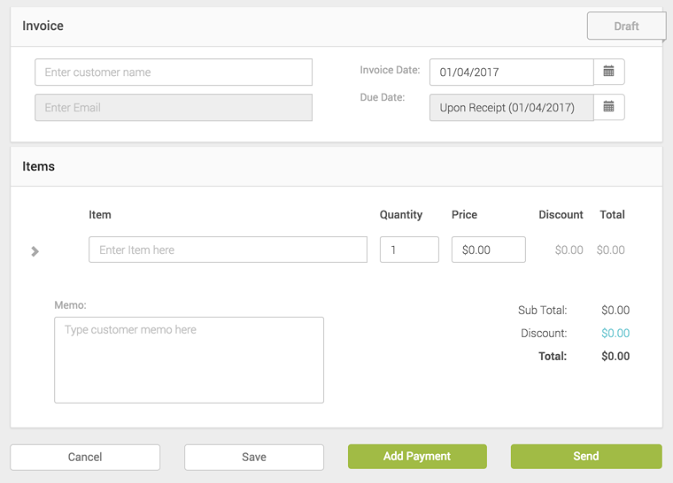
Now you will be taken to a new screen to fill out your invoice information found in the image to the right.
There are a lot of fields to discuss on this page so let's break it up by top and bottom.
Top section: customer name, customer email, invoice date, due date, billing and shipping address, PO number, and Payment link
Bottom section: items, quantity, price, discounts, total, tax, and memo.
#Customer Information#
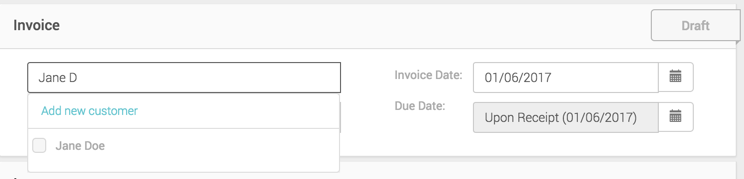
Enter Customer Name - Start typing in the name of the customer, a list will appear with potential matches (this is pulling from the customers you have already created on the customer tab in the left menu).
-
If you see the customer you are looking for in the drop-down list provided, simply click the checkbox to the left of the customer name.
-
If you don't see the customer name or that customer does not yet exist, simply click the blue Add New Customer text at the top of the list. Clicking this will open a pop-up for you to create the customer record. Enter the first and last name (if it isn't there already) and any other information you wish to provide, then click save. You are now back to the invoice and should see your customer has been added in the first field.
Enter Email - This is the email address for the customer that the invoice will be sent to when clicking the Send button at the bottom of the page. If your customer already has an email address associated with their account/record it will automatically appear in the email box.
-
If you would like to change the email address to another email simply click the red X to the right of the field and enter a new email address.
-
If you just created this customer on the invoice they won't have an email address so you will need to manually enter the email address for this customer here. Next time you invoice the customer this email address will appear so you don't have to type it again.
Invoice Date and Payment Terms
Invoice Date - Automatically uses the date you are creating the invoice, however, you do have the option to change it to any date in the future. To change the invoice date, simply click on the calendar icon to the right.
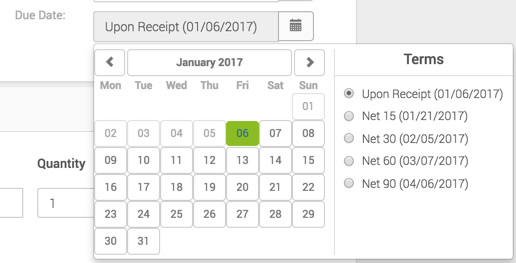
Due Date and Terms - Terms are set automatically based on the default you have selected under invoice settings, however, you can change the due date and terms on the invoice by clicking on the calendar icon to the right. You will then see two options (shown in the image below):
- To select your own due date from the calendar
- Select the terms you want to allow for this invoice. If you select a term, MX™ Merchant shows you the calculated due date based on the term selected.
More Section
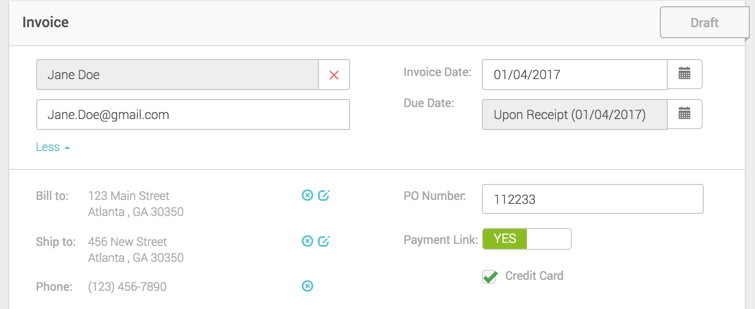
Now that the customer information has been entered you will see a blue More button appear just below the email address field. This section contains billing address, shipping address, additional contact information, PO number and payment link options. This is additional information that will usually be pre-populated for you based on the customer information being filled out or default settings.
Bill To, Ship To, and Phone - The billing is where the invoice should be sent or the address for the credit card. Shipping is the address that the items should be sent to and phone number is additional contact information.
- If you would like to change the billing address, shipping address, or phone number for the customer on the invoice simply click the blue pencil icon to the right of the x. This will allow you to add a new address or select another one on file.
- If you just created this customer they won't have an address so you will need to manually enter one by clicking on the blue plus icon if you find this to be important to capture on the invoice.
PO Number - This is a free form box, if you have another system that you use in conjunction with MX™ Merchant and need to capture a reference number you can add it in this field.
Payment Link - A payment link is provided when the invoice is sent via email to the customer. On the invoice it will give the customer the option to make a payment and enter in their card/account information. Once the payment is processed it will automatically update the invoice for you.
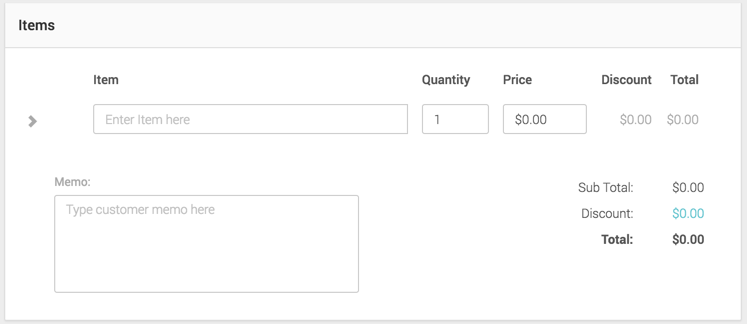
Item Information
Items are manually entered (unless you have the MX™ Retail app installed and then you can use products on the invoices and track inventory).
Enter Item Here - You can type the item name and/or description of the good or service the customer is being billed for. Once you are done filling out the item information you can click tab to get to the next field or use the mouse and click into the next field. When you move onto the next field you will notice another line item appears for you to continue entering as many items as you need.
Quantity - The amount of this item are you billing this customer. The default is 1 but you can change it to any number higher than 1.
Price - The amount the customer is being charged for this item. Please note the price should be for one item, if the quantity is greater than 1 MX™ Merchant will calculate the total for you.
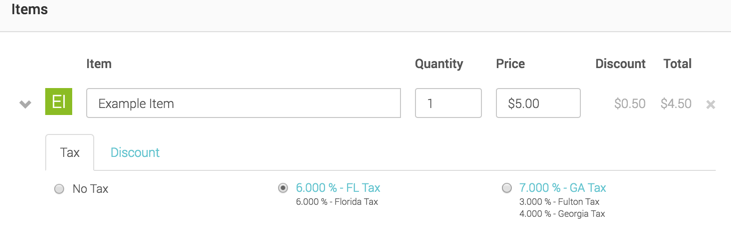
Item Tax
To add tax to the line item simply click the chevron or arrow found to the left of the item. A new section will expand showing you the taxes and discounts, tax being the first tab. You can only select one tax category per item. When you select a tax rate it will appear in the calculation total to the right of the memo.
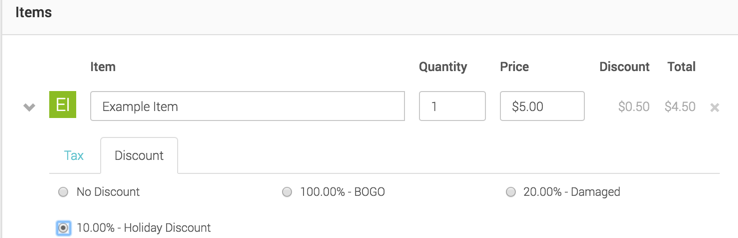
Item Discounts
To add discounts to the line item simply click the chevron or arrow found to the left of the item. A new section will expand showing you taxes and discounts. Click on the discount tab. Now you will see the discounts you have created in the discount settings. You can only select one discount per item. When you select a discount it will automatically reflect to the right of the price and the total will also be updated.
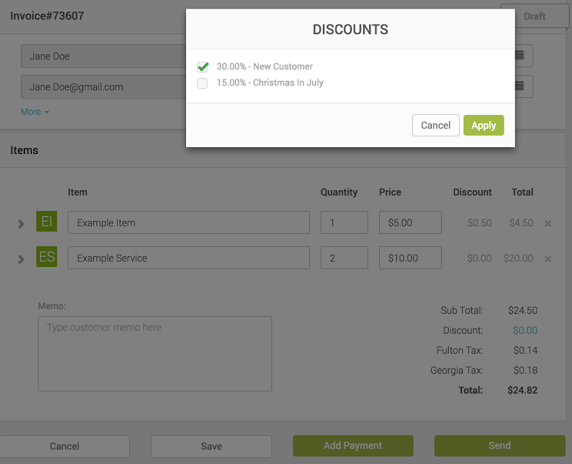
Order Discounts
You can add as many order level discounts as you would like. To do so simply click on the $0.00 in blue under the subtotal. A pop-up will appear and allow you to select using a checkbox all of the order level discounts you want to apply in addition to the line item discounts
Once you have made your selection don't forget to click the green Apply button to confirm.
Buttons
The buttons at the bottom of the invoice (also pictured below) allow additional flexibility with the invoicing capability.
- Cancel - Completely delete this invoice
- Save - Save as draft and come back to it later or save and keep working without having to worry about losing all of the work you have already done.
- Add Payment - If you don't want to send the invoice to a customer and just want to add a payment just click this button, enter in the payment info and you are set!
- Send - If you would like to send a copy of the invoice to the customer or you have the payment link option turned on and would like them to pay directly to the invoice.

View
To see more information on an existing invoice click on the invoice number within the list view of the invoice page. Doing so will take you to the invoice preview shown in the image below. This preview is what the customer saw if you choose to email them a copy of the invoice.
The next image is what you will see in the MX™ Merchant dashboard.

This is what your customers will see when the invoice is sent to them via email.

Edit
As long as there are no payments on an invoice the information and line item detail can still be changed. To change an invoice click on the more button in the upper right of the screen. Here you have the following four options:

- Cancel - This is how you would void out this invoice if you didn't want to bill the customer any longer or needed to start over on a new invoice
- Edit - This will take you back to the first screen (just like what you saw when you were creating the invoice for the first time) to make the desired changes, save, and resend.
- Print - Here you can print the invoice for your own records or if you wanted to hand a copy to the customer.
- Resend - You can email or text the invoice in case they failed to receive it the first time or as a reminder to pay.
Payment
To add a payment on an invoice click on the green +Add Payment button while on the invoice preview. Once you click on the button a pop-up will appear, pre-filled with the outstanding balance of the invoice. This is just like Quick Pay so across the top you can change your options to fit the payment method and presentment types for this payment. If you would like to change the amount to break up the payments simply click in the amount field, clear out the numbers and start typing the desired payment amount. Complete the payment depending on your tender type selected and click charge/tender.


Return An Item
Once a payment has been made on an invoice and the customer needs to return an item you can do so by clicking the "More" button in the upper right while on the invoice preview. Here you will see a new option which says "Add Return". Clicking on this option will bring up a pop-up.

Now you will see the pop-up below with the following fields:

Select Items to Return - The items shown here will pull from the items you have on your invoice. Use the check box to the left of the item to select which item you would like to return. Double check that the quantity is correct and the total will calculate for you.
Select Payment to Return - The payment methods shown are those that were made to pay the invoice, select the payment method you would like to return the funds to.
Please note you can only return an amount less than or equal to the amount the customer has paid. For example, you can not return $10.00 to a customer who has only paid for $5.00.
Date - Day the return was made. This is for the history event to tell you the date that the return was made and is defaulted to the current date.
Return Reason - This is optional, if you would like to list out why the item was returned for future reference you can do so here.
When you are done, click the green Return button at the bottom of the pop-up.
Videos
Updated about 6 years ago