Invoice App
If both the ACH.COM app and the Invoice app are installed/active at the same time the ACH payment type will then be available for both Invoices and Recurring plans.
Invoices
When the ACH.COM app is installed you won't notice an immediate difference in the invoice page until you go to process a payment.
Invoice Payments
An invoice can be paid with an ACH account by clicking the +Add Payment at the top of an unpaid or partially paid invoice. This will make the Quick Pay modal appear, from here you can select the middle drop down (tender type) and select ACH.
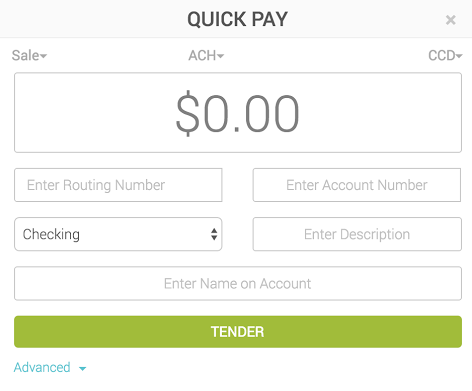
Once ACH is selected, enter in the required fields listed below and click the Tender button.
- Determine if it is a sale or refund
- Choose ACH on the center drop down (if it isn't already defaulted)
- Choose the SEC code that represents your transaction
- CCD - Consumer purchase
- PPD - Business purchase
- TEL - Over the phone
- WEB - Over the internet
- Enter the amount of the transaction
If the customer associated with the invoice already has an ACH account on file with you simply click into the routing or account number section once you have ACH selected and the last 4 of the account number will appear for you to select.
Account information(you will need to gather this information from the customer):
- Payees routing number
- Payees account number
- If it is a checking or savings account
- Enter a description - limited to 10 characters
- Name on Account
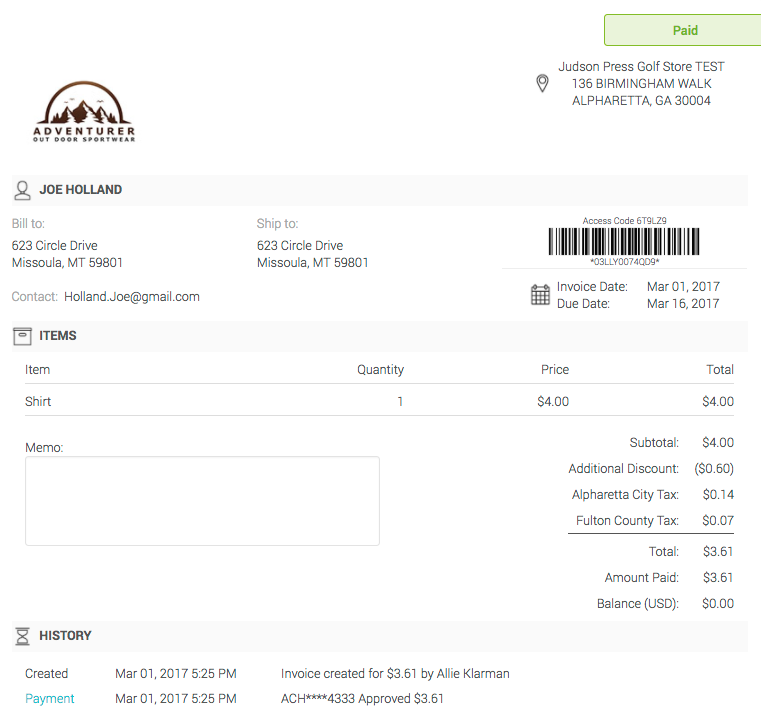
Once a payment has been made on an invoice you can review that payment either on the Payments screen (click Payments on the left-hand menu) or within the history section of the invoice.
As shown in the image to the left, clicking on the word Payment in blue under the history section will open a pop up for you to see additional information about this transaction and its status.
Payment Link
Another great feature that is available with the ACH.COM app and Invoice app is the ability to let your customers pay with their own ACH account when you email the invoice to them. This is referred to as a payment link within MX™ Merchant, however, previously referred to as Click2Pay.
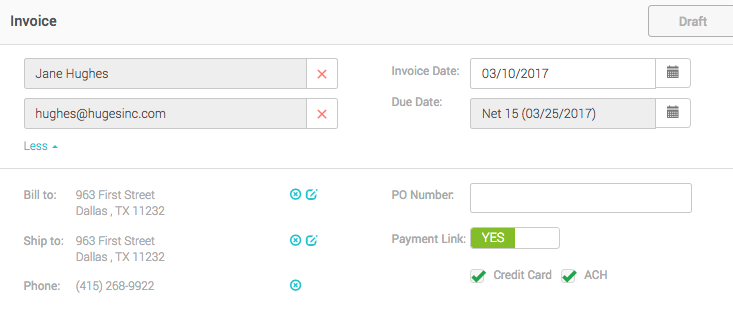
The payment link options on an invoice can be found when creating a new invoice. Once a customer has been associated with the invoice you will see a more button appear just below the email field. Clicking on that option will display an additional section, to the right of that newly expanded section you will notice the option for Payment link with a yes/no toggle and checkboxes for the payment type.
The payment link options on an invoice can be found when creating a new invoice. Once a customer has been associated with the invoice you will see a more button appear just below the email field. Clicking on that option will display an additional section, to the right of that newly expanded section you will notice the option for Payment link with a yes/no toggle and checkboxes for the payment type.
If you would like to allow your customers to pay through the payment link on their emailed invoice and enter in their own payment information make sure your options are showing payment link is Yes and then set the checks to the payment methods available to your customers when they try to pay this invoice.
Recurring
Just as with invoices, the same is true of recurring plans. When the ACH.COM app is installed you won't notice an immediate difference in the recurring page either until you go to associate a payment method with the plan.
Recurring Payments
A recurring plan can be set up with an ACH bank account to be billed automatically instead of a credit card each time the recurring plan payment is due.
Once a customer has been associated with the recurring plan scroll down to the bottom of the page where you will find the Payment section.
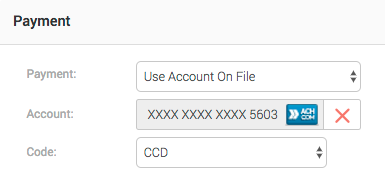
Select the following to bill a bank account for this customer:
- Payment - Use Account On File
- Account - Select Account. If the bank account has already been added to the customer's account vault simply select the account from the list. If it has not yet been added, click Add New in blue within the list. Select ACH from the first drop down within the pop-up and enter in the required information, then click save.
- Code - Choose the SEC code that represents your transaction:
- CCD - Consumer purchase
- PPD - Business purchase
- TEL - Over the phone
- WEB - Over the internet
Now each time the recurring plan is set to charge the customer it will bill them directly to the bank account on file rather than a credit card.
Payment Link
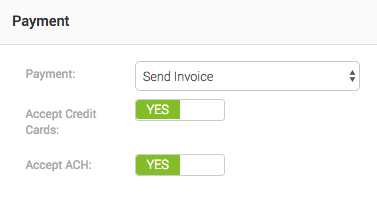
If you don't want to automatically bill a customer each month and you want to allow them to enter their own information when the bill is due you can do so with the following steps.
Once a customer has been associated with the recurring plan scroll down to the bottom of the page where you will find the Payment section.
Select the following:
- Payment - Send Invoice
- Accept Credit Cards - Select Yes if you want to allow the customer to pay with a credit card.
- Accept ACH - Select Yes if you want to allow the customer to pay with a bank account.
Updated over 5 years ago
